epptm
v1.3
Get Started
With our Perfect & Complete Starter Kit for Elementor
To follow this procedure, we assume that you already have installed WordPress somewhere as well as the extensions Elementor and Elementor Pro. Of course, you also need to download our Elementor Complete Starter Kit 😉
Installation
Theme
For a better experience, we recommend using the Hello Theme from Elementor.
- Go to WordPress Admin > Appearance > Themes > Add New > Search or Upload Theme
- Click on Install then Activate Theme
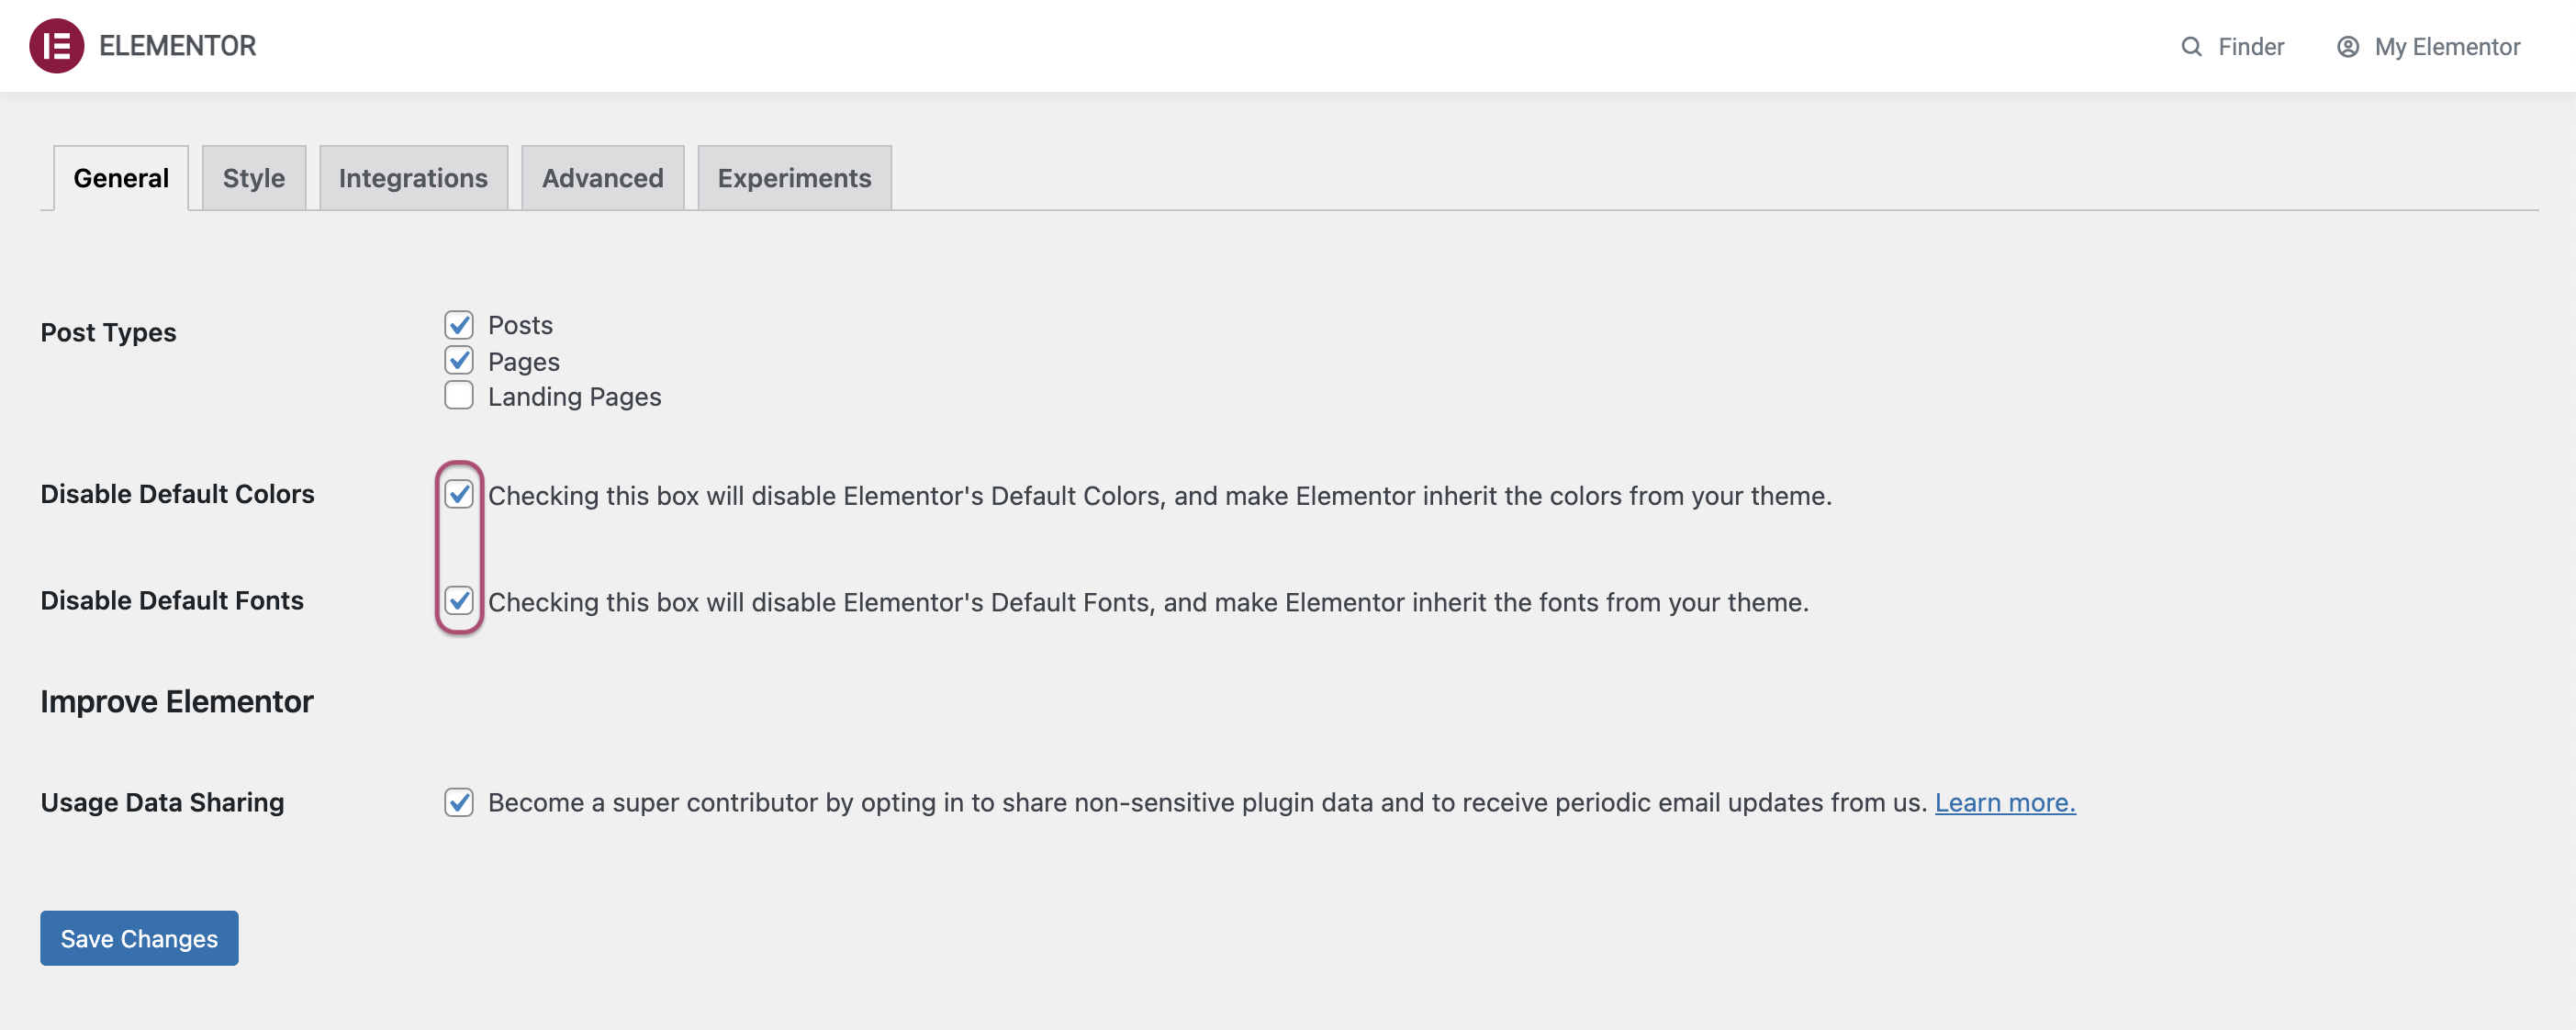
Elementor Settings
- Go to WordPress Admin > Elementor > Settings
- Check the boxes Disable Default Colors and Disable Default Fonts
Import Kit
- Go to WordPress Admin > Elementor > Tools
- Click on Import / Export Kit tab
- Click on Start Import button

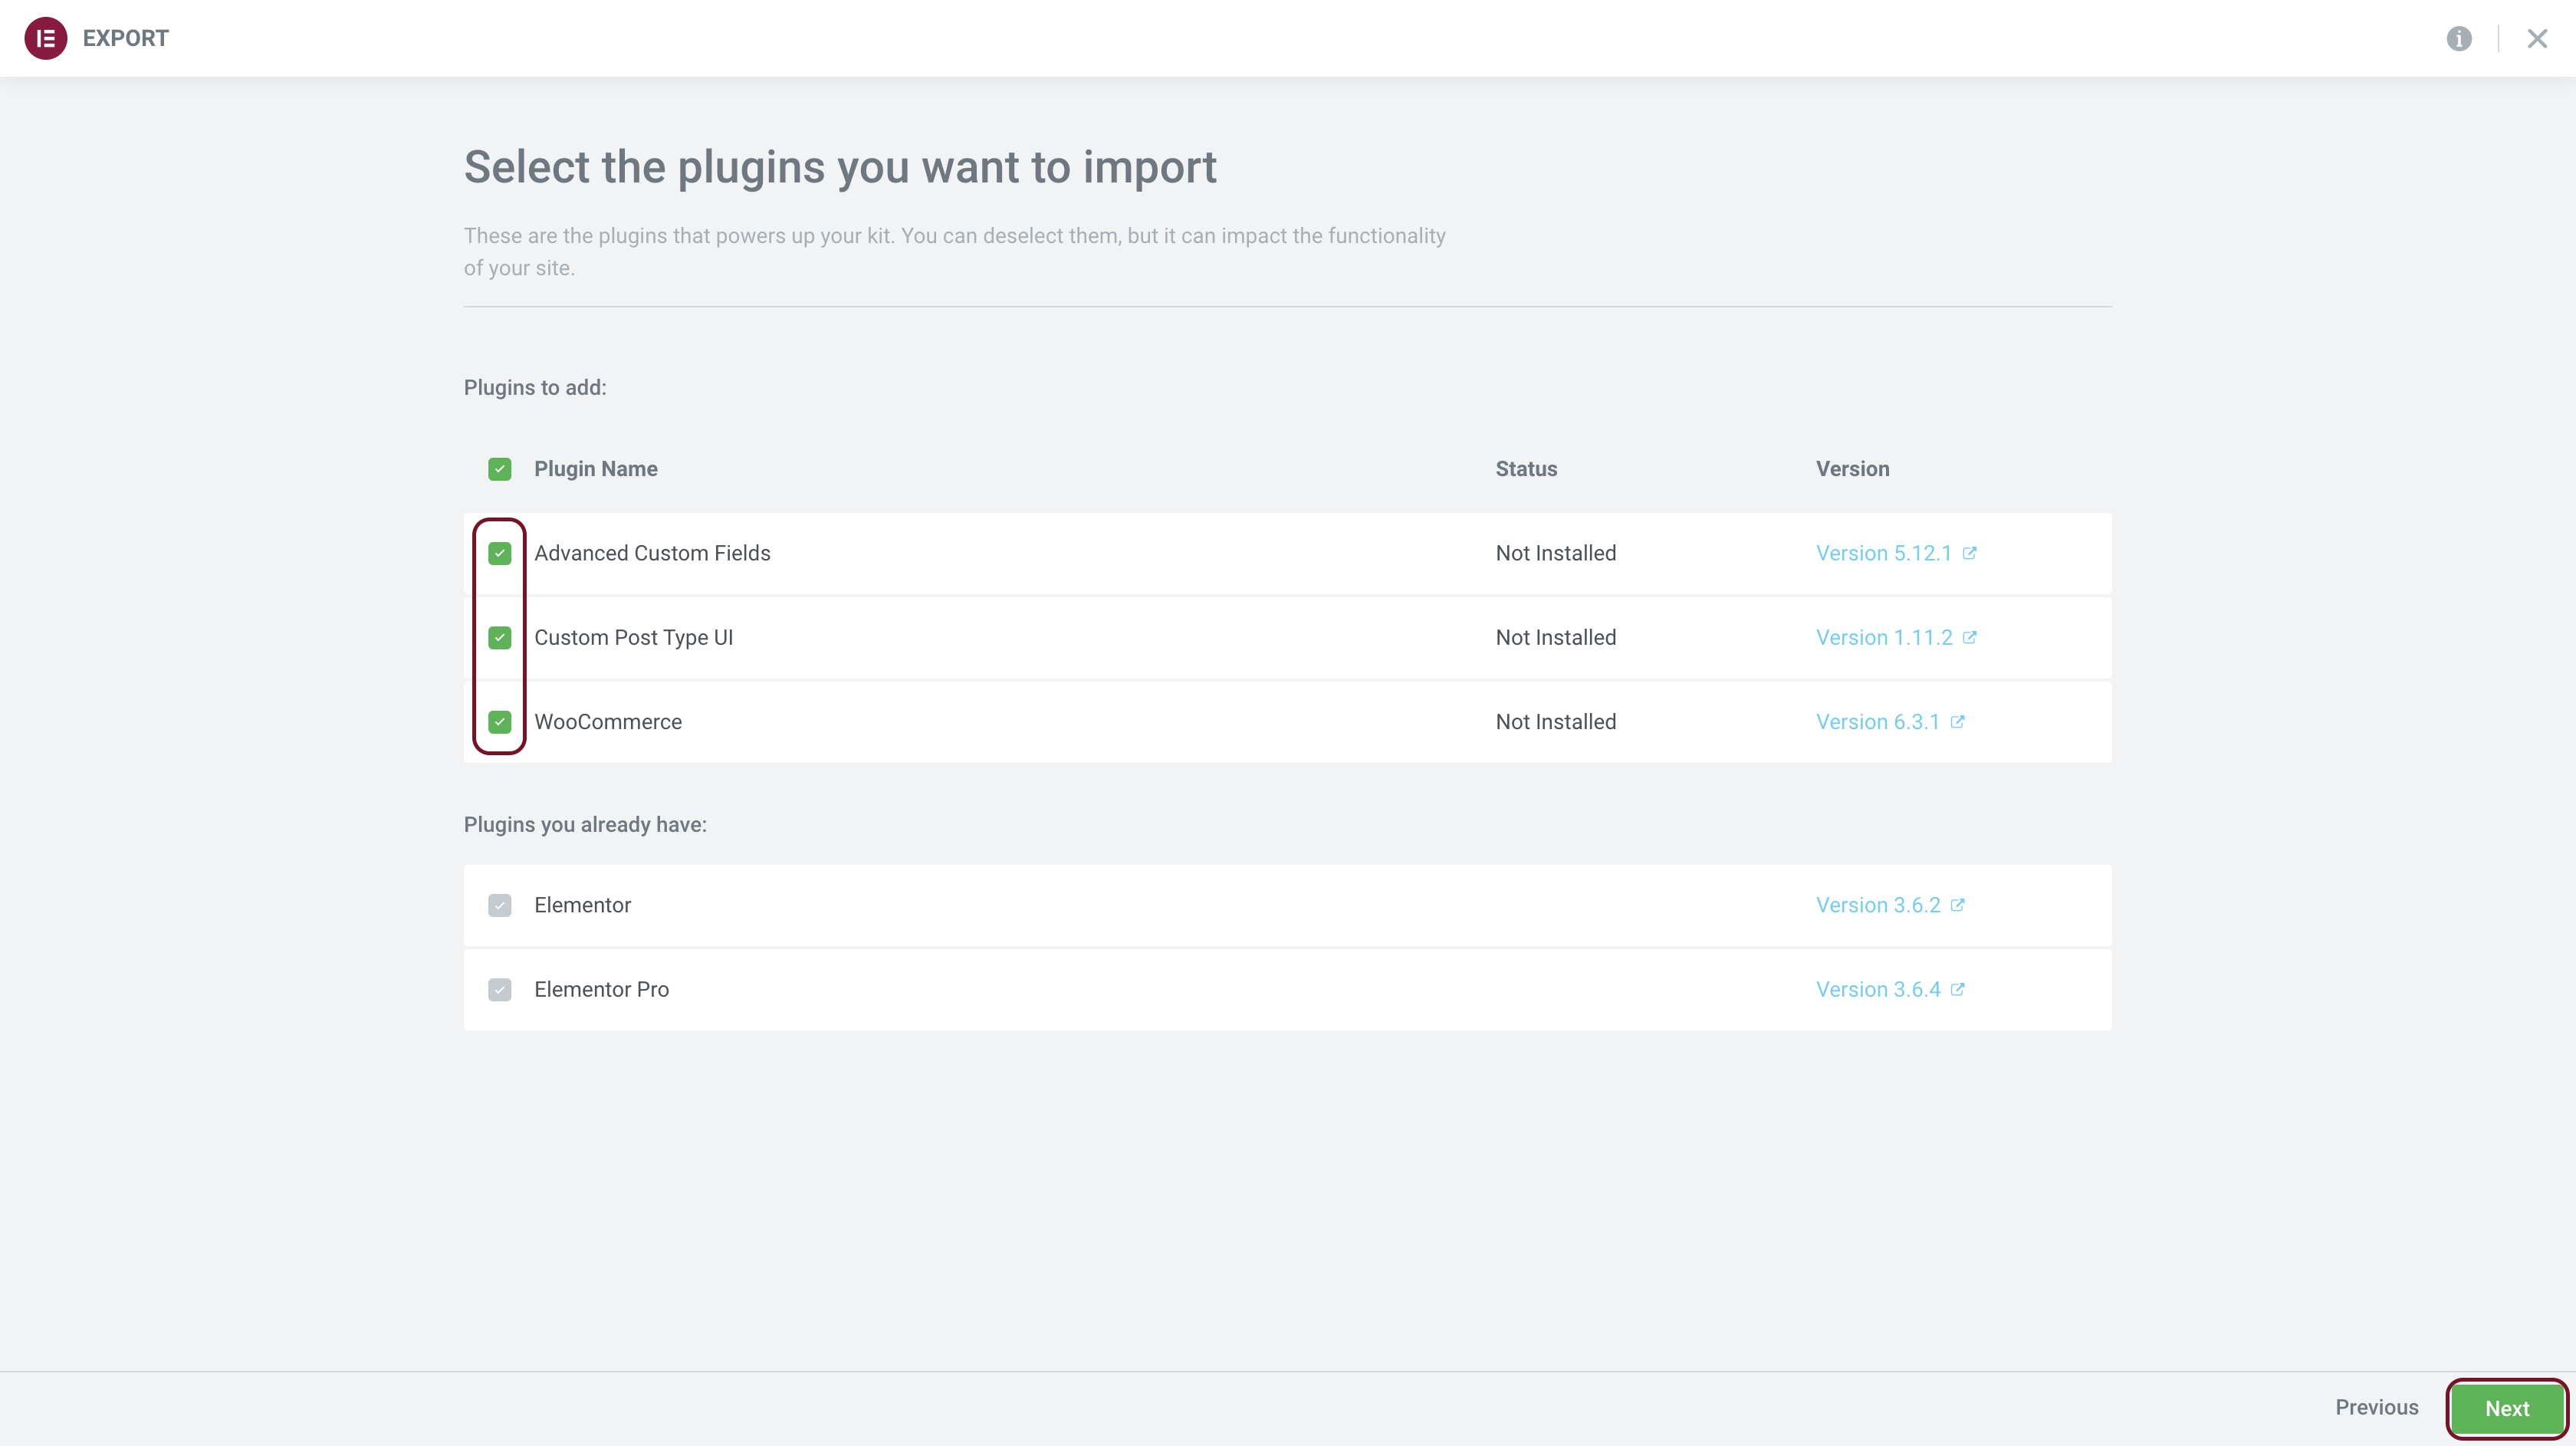
- Unzip our Kit‘s zip file > Select elementor-kit.zip file
- Leave Advanced Custom Fields and Custom Post Type UI boxes checked if you need a Portfolio on your website
- Leave WooCommerce box checked if you need a shop on your website
- Click Next button
- Leave all the boxes checked to import the complete site demo
- Click Next button
- Click enable if there is SVG popup
- Wait while the installation is done. Do not leave the page during the process…
- After the success message “Your kit is now live on your site!”, you can click on Close button


Well done! You're ready to use your website!
Menus
By default our Elementor Complete Starter Kit use three different menus: Top Menu, Main Menu and Footer Menu. Here’s how to set them.
Settings
Main Menu
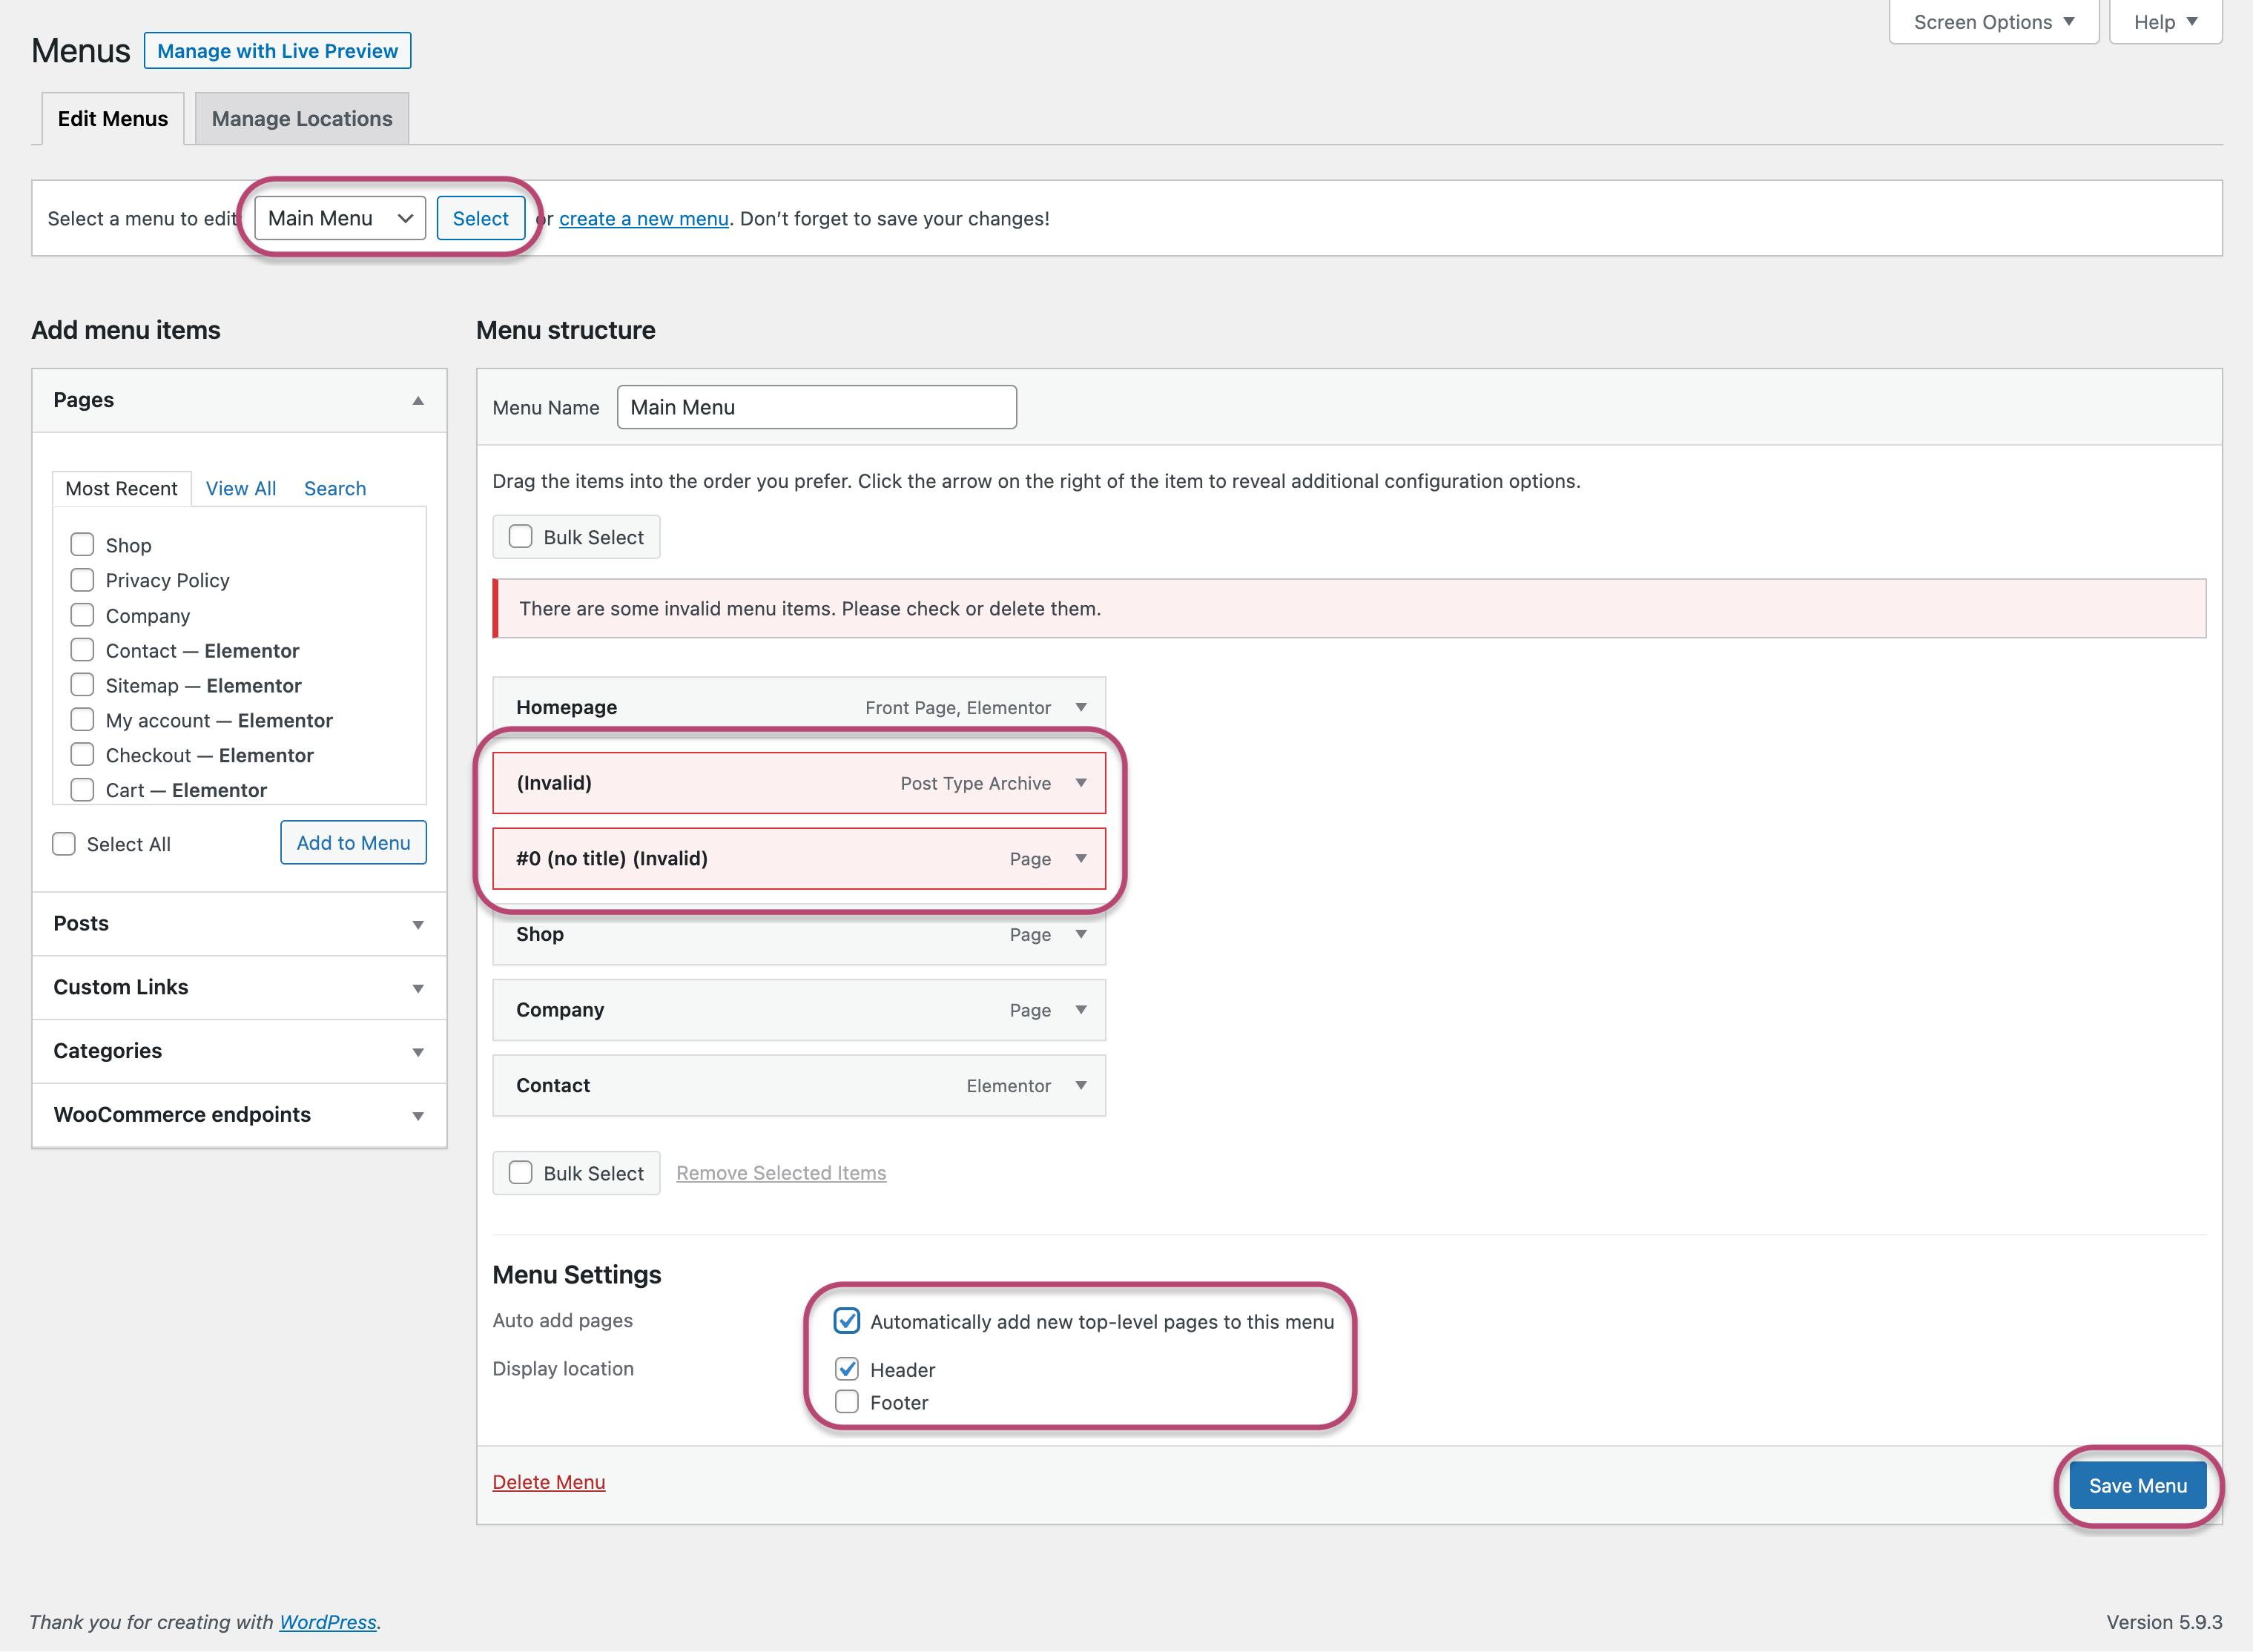
- Go to WordPress Admin > Appearance > Menus > Select the Main Menu
- Remove invalid links
- Check the Automatically… & Header boxes
- Click on Save Menu button
Footer Menu
- Go to WordPress Admin > Appearance > Menus > Select the Footer Menu
- Check the Footer box
- Click on Save Menu button

Display
Here’s how to assign them to the right place:
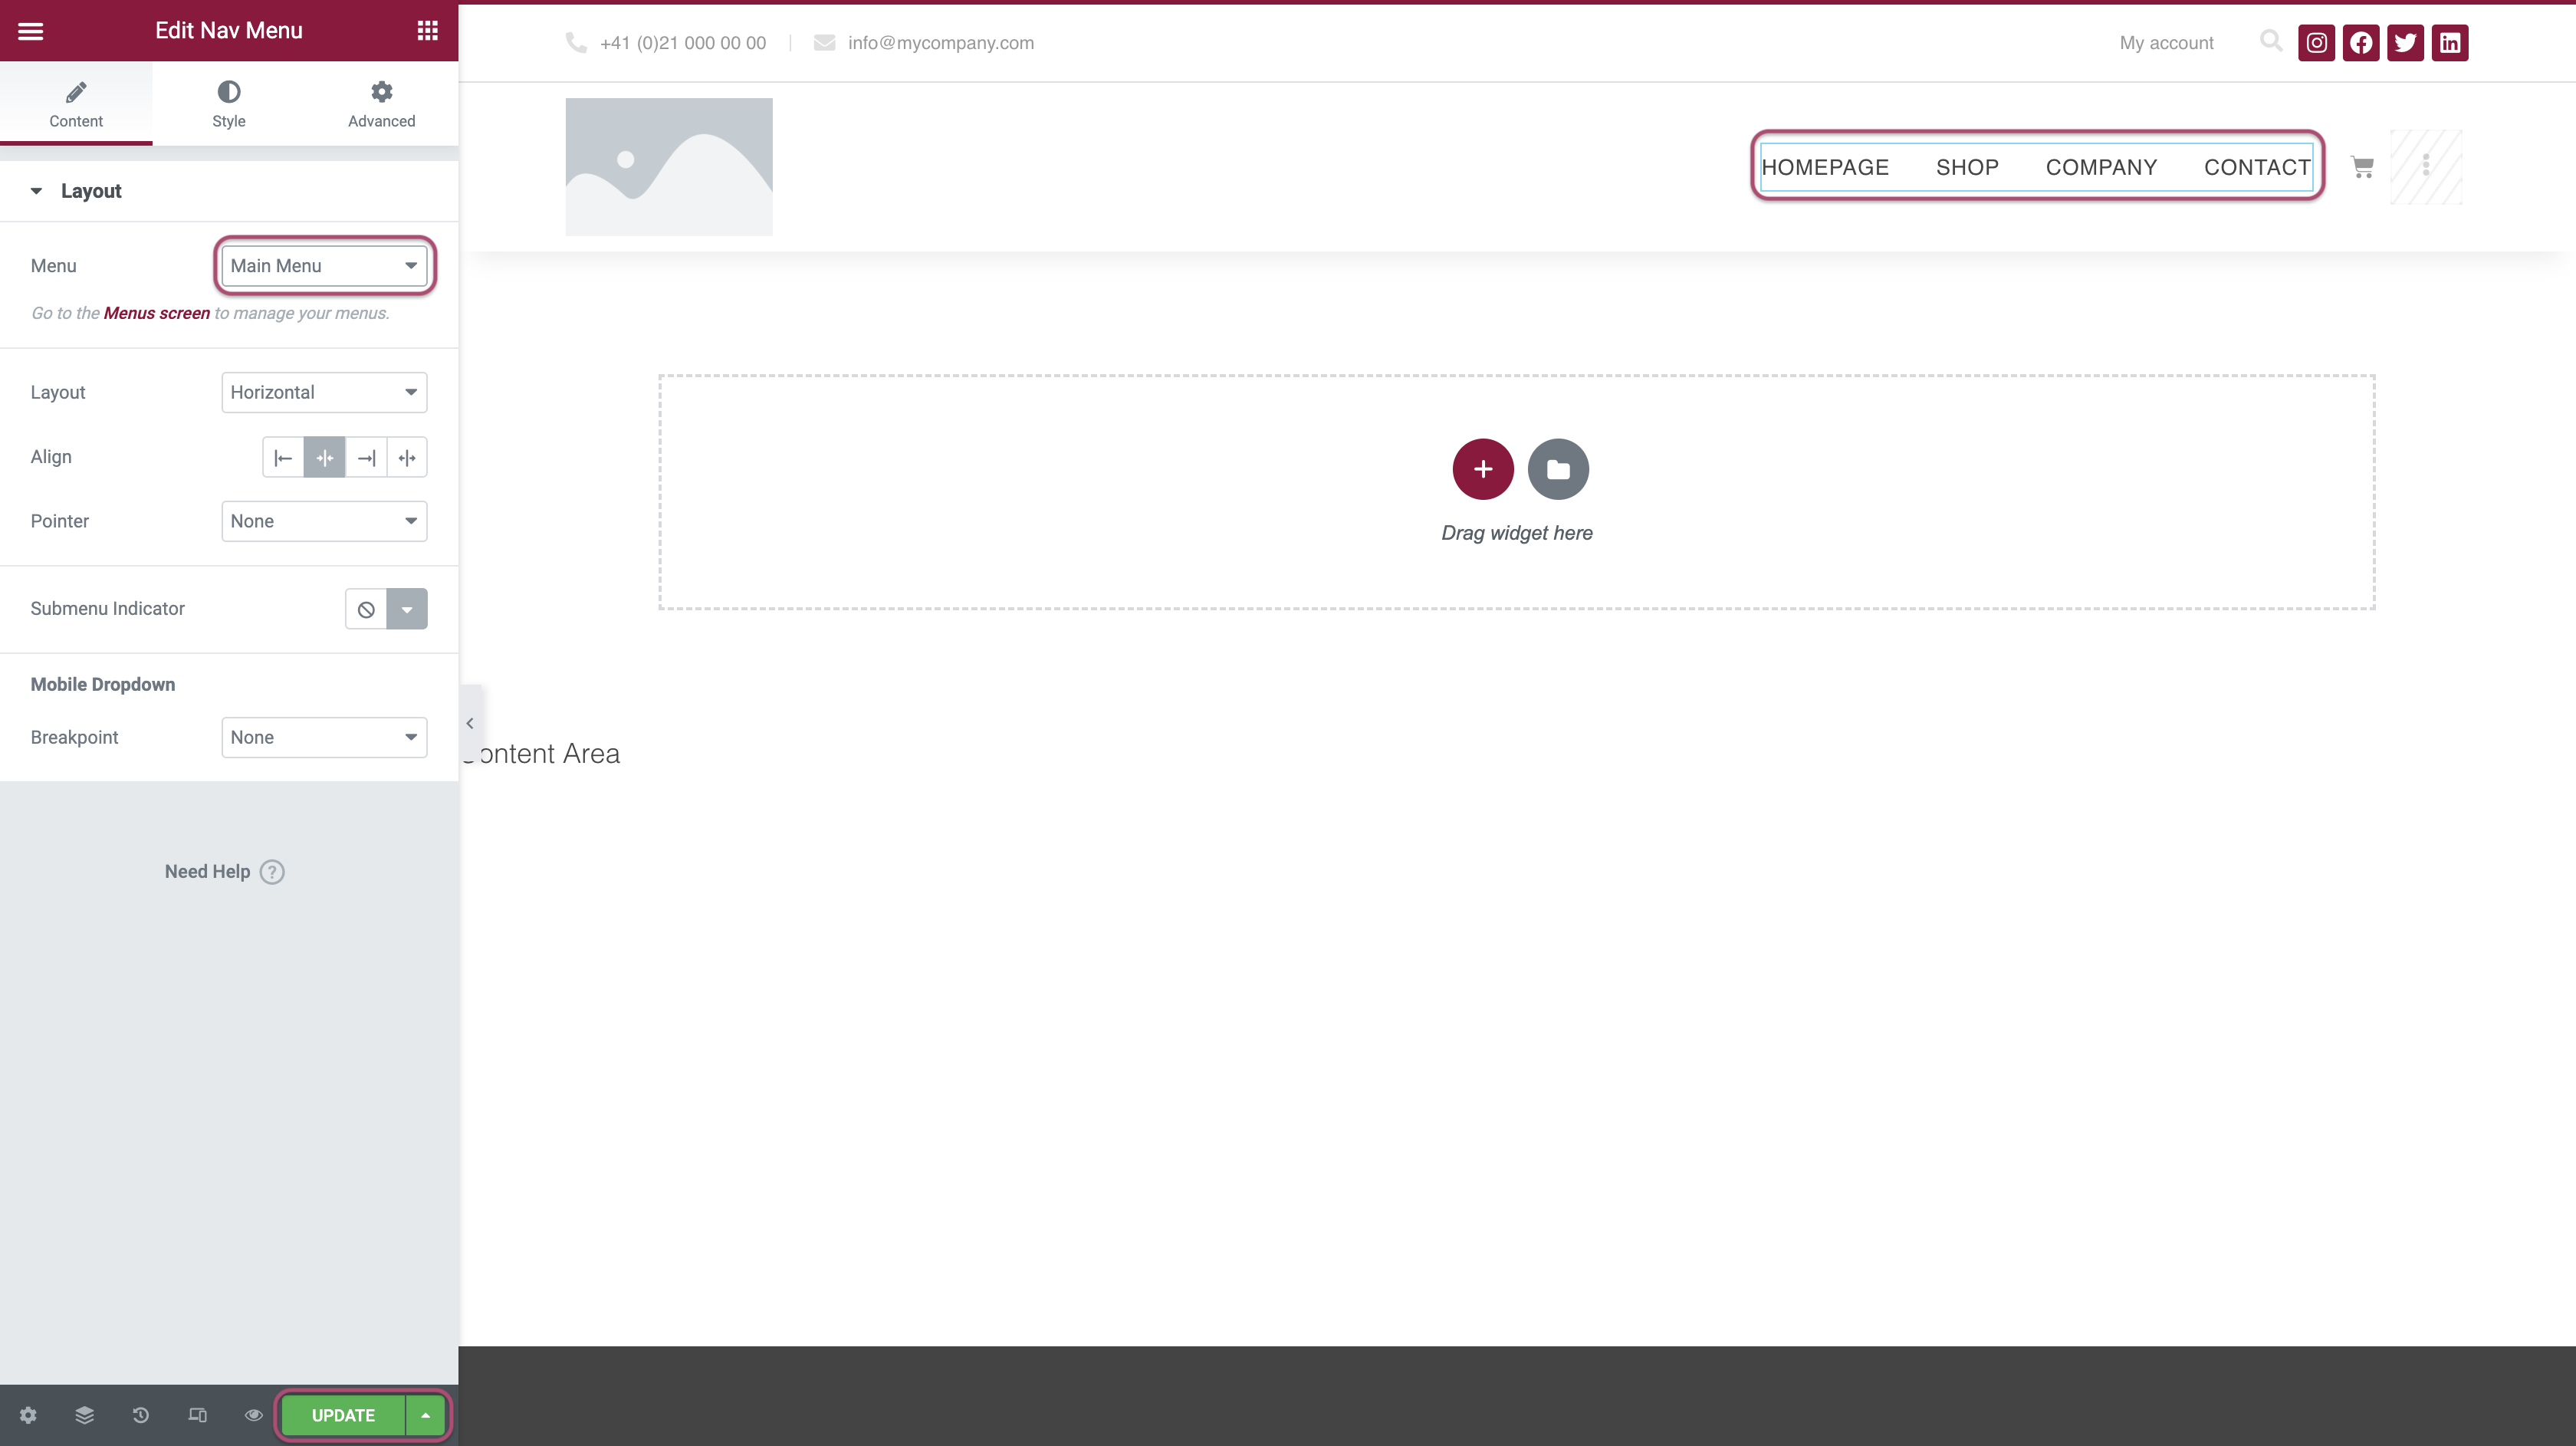
Top Menu
- Go to WordPress Admin > Templates > Saved Templates > All
- Hovering over Header > Click on Edit with Elementor
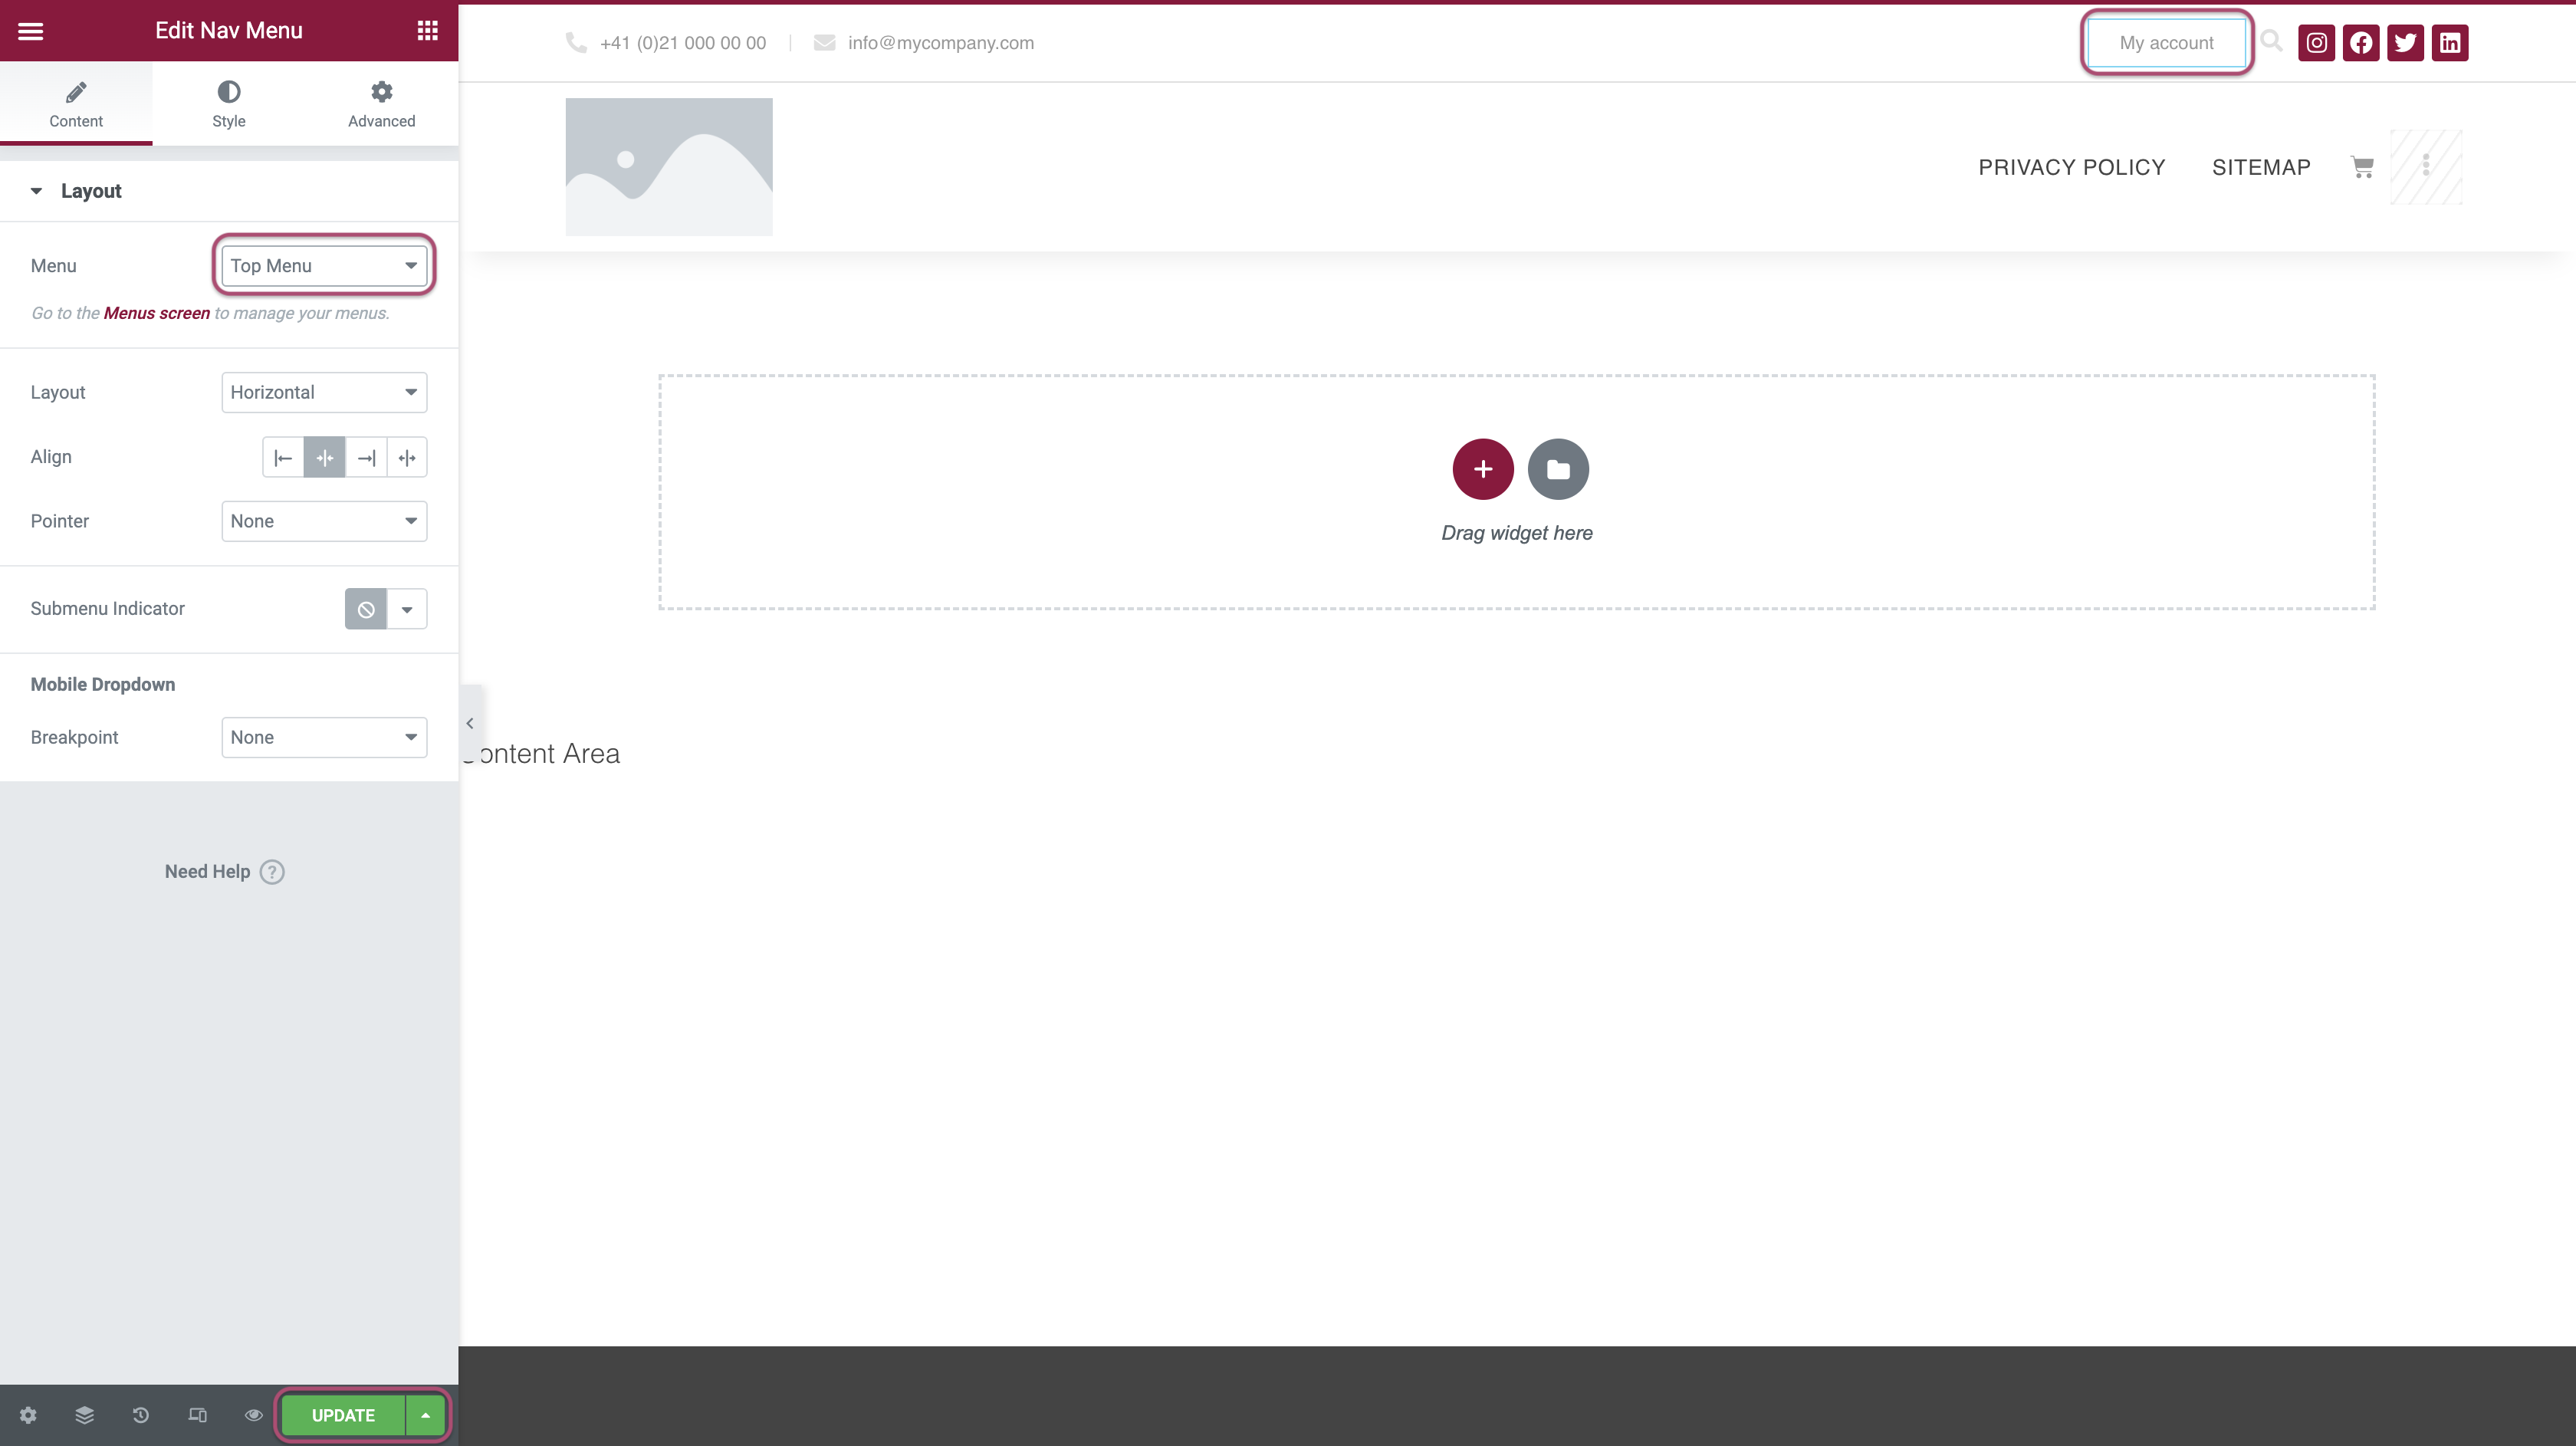
- In top section, before the magnifying glass icon and the social network icons, click on Menu element
- Select Top Menu in Elementor panel options
- You can click on Update button or directly follow the next step for the Main Menu
Main Menu
- Then in main section, between logo picture, cart icon and responsive menu icon, click on the Main Menu element
- Select Main Menu in Elementor panel options
- Click on Update button
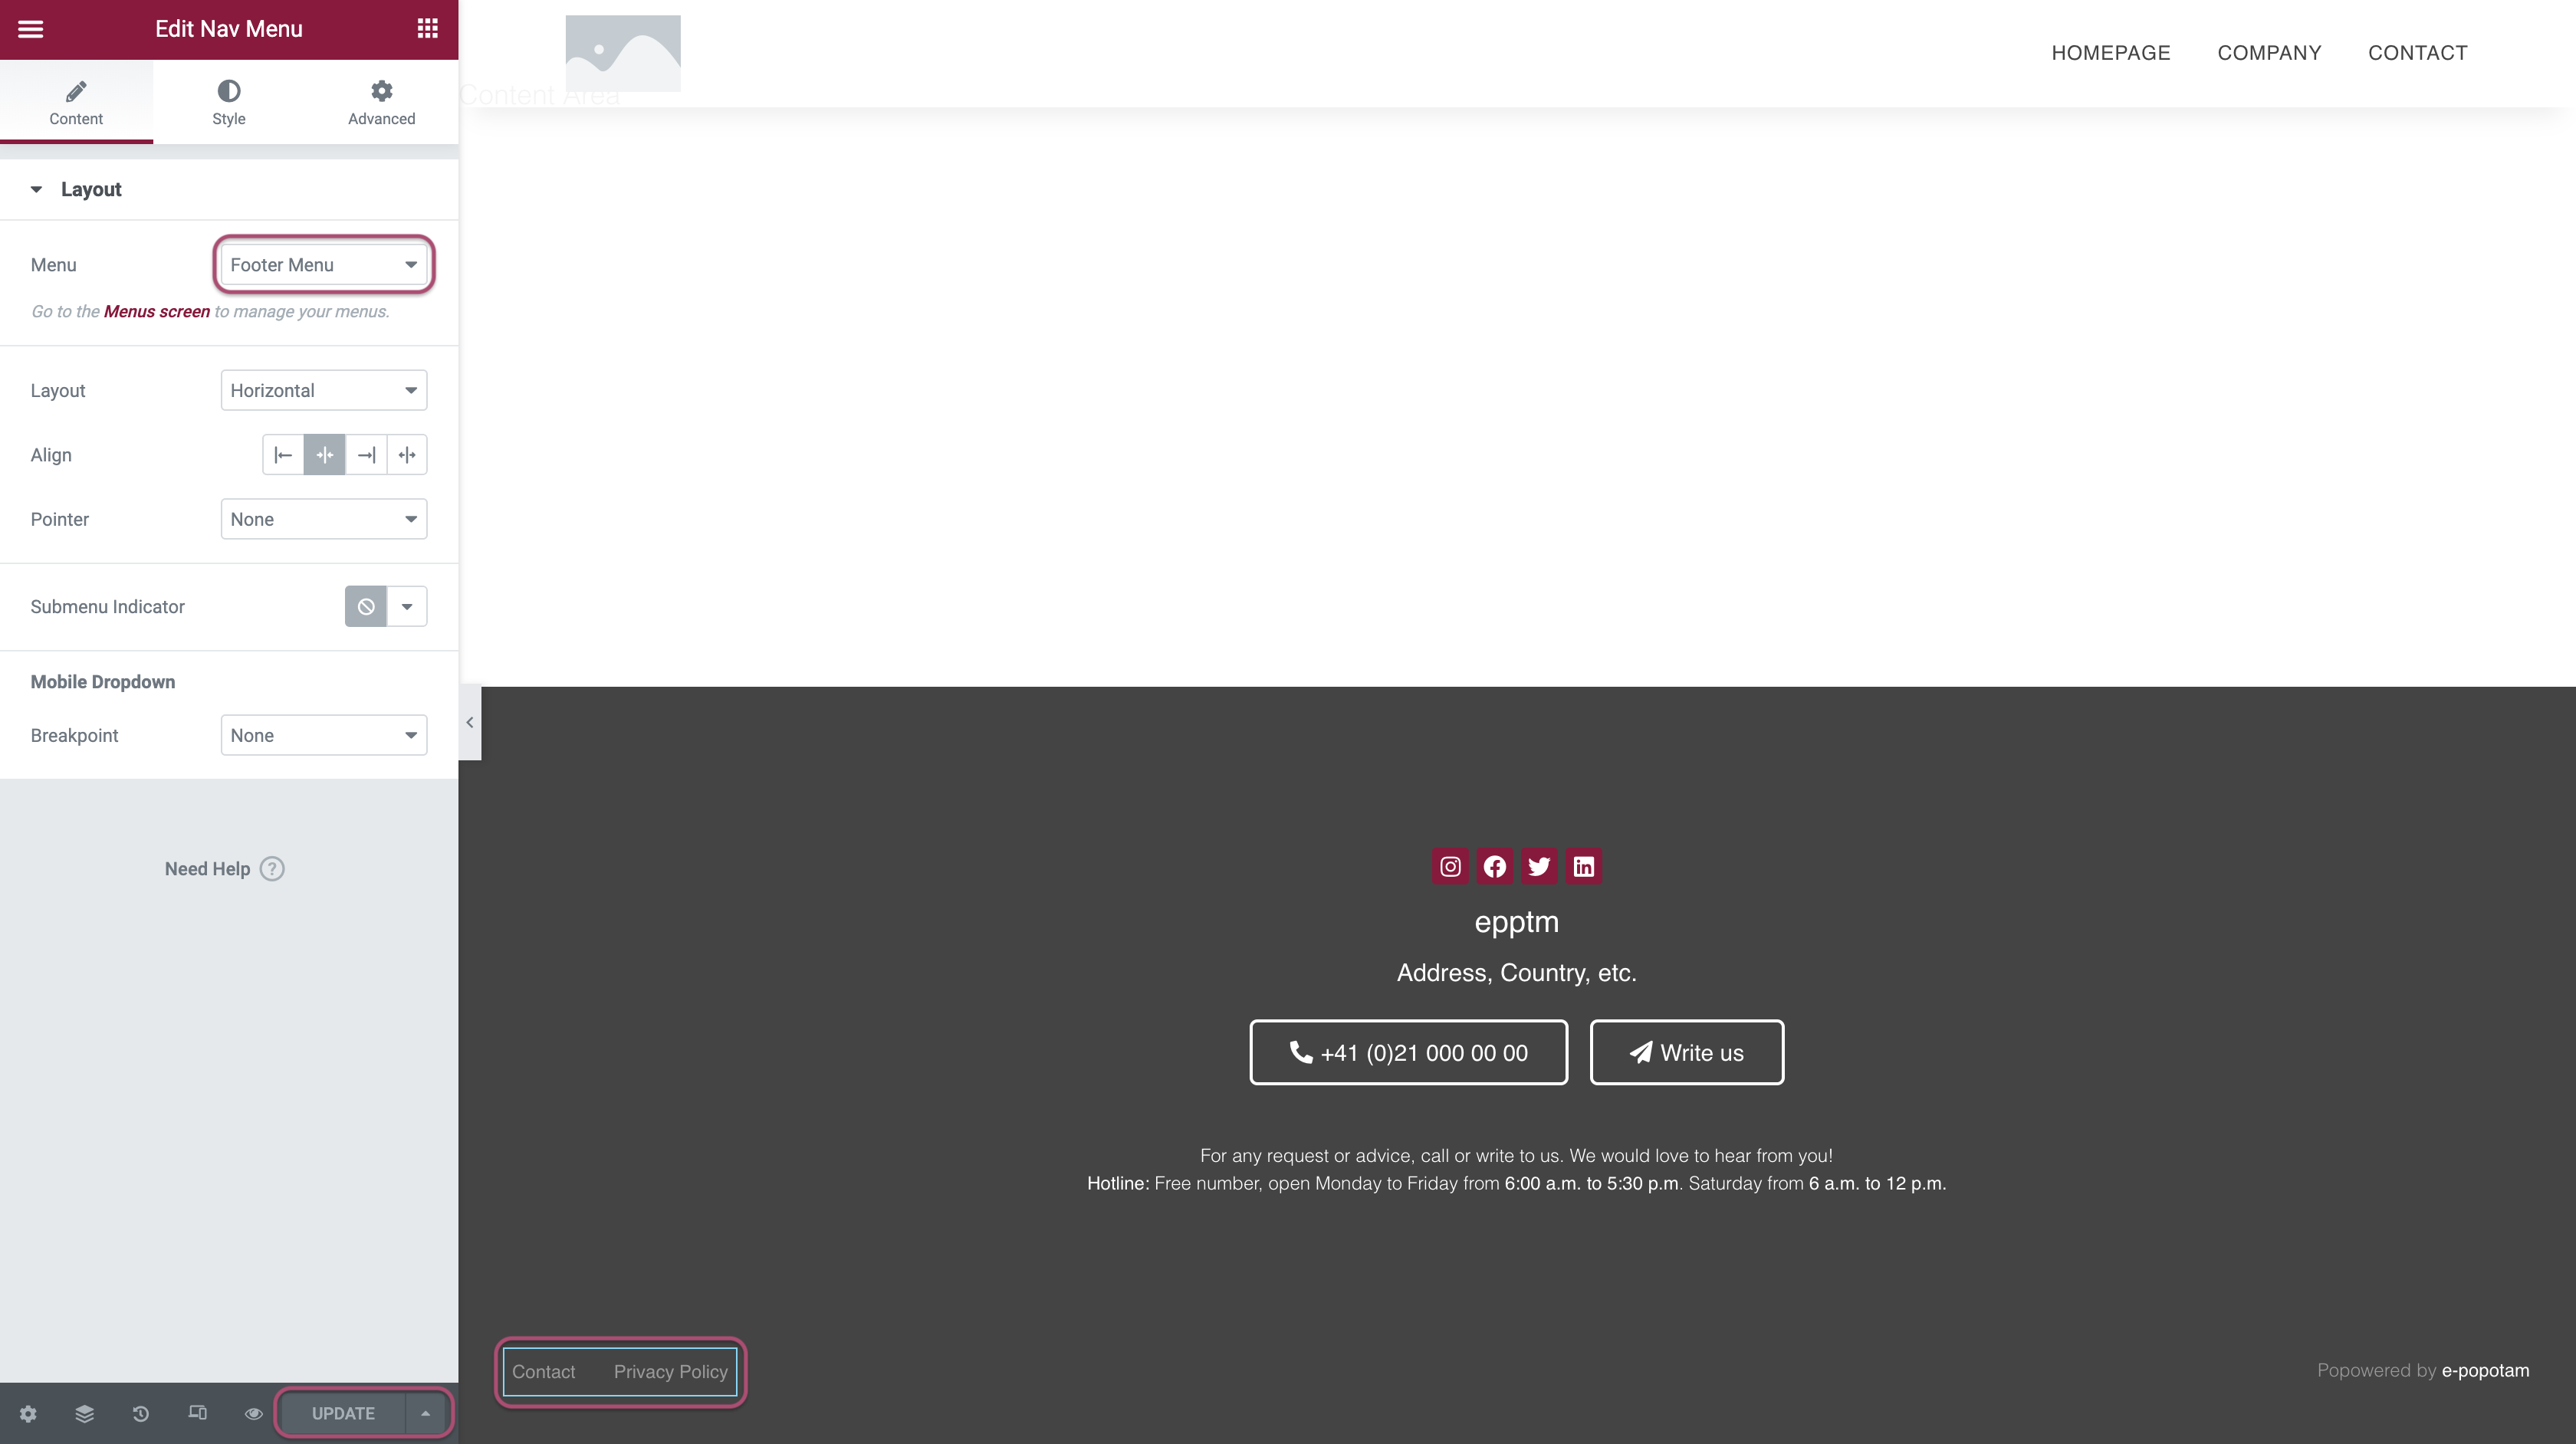
Footer Menu
- Go to WordPress Admin > Templates > Saved Templates > All
- Hovering over Footer > Edit with Elementor
- Click on the Footer Menu element on the bottom left corner
- Select the Footer Menu in Elementor panel options
- Click on Update button
Popups
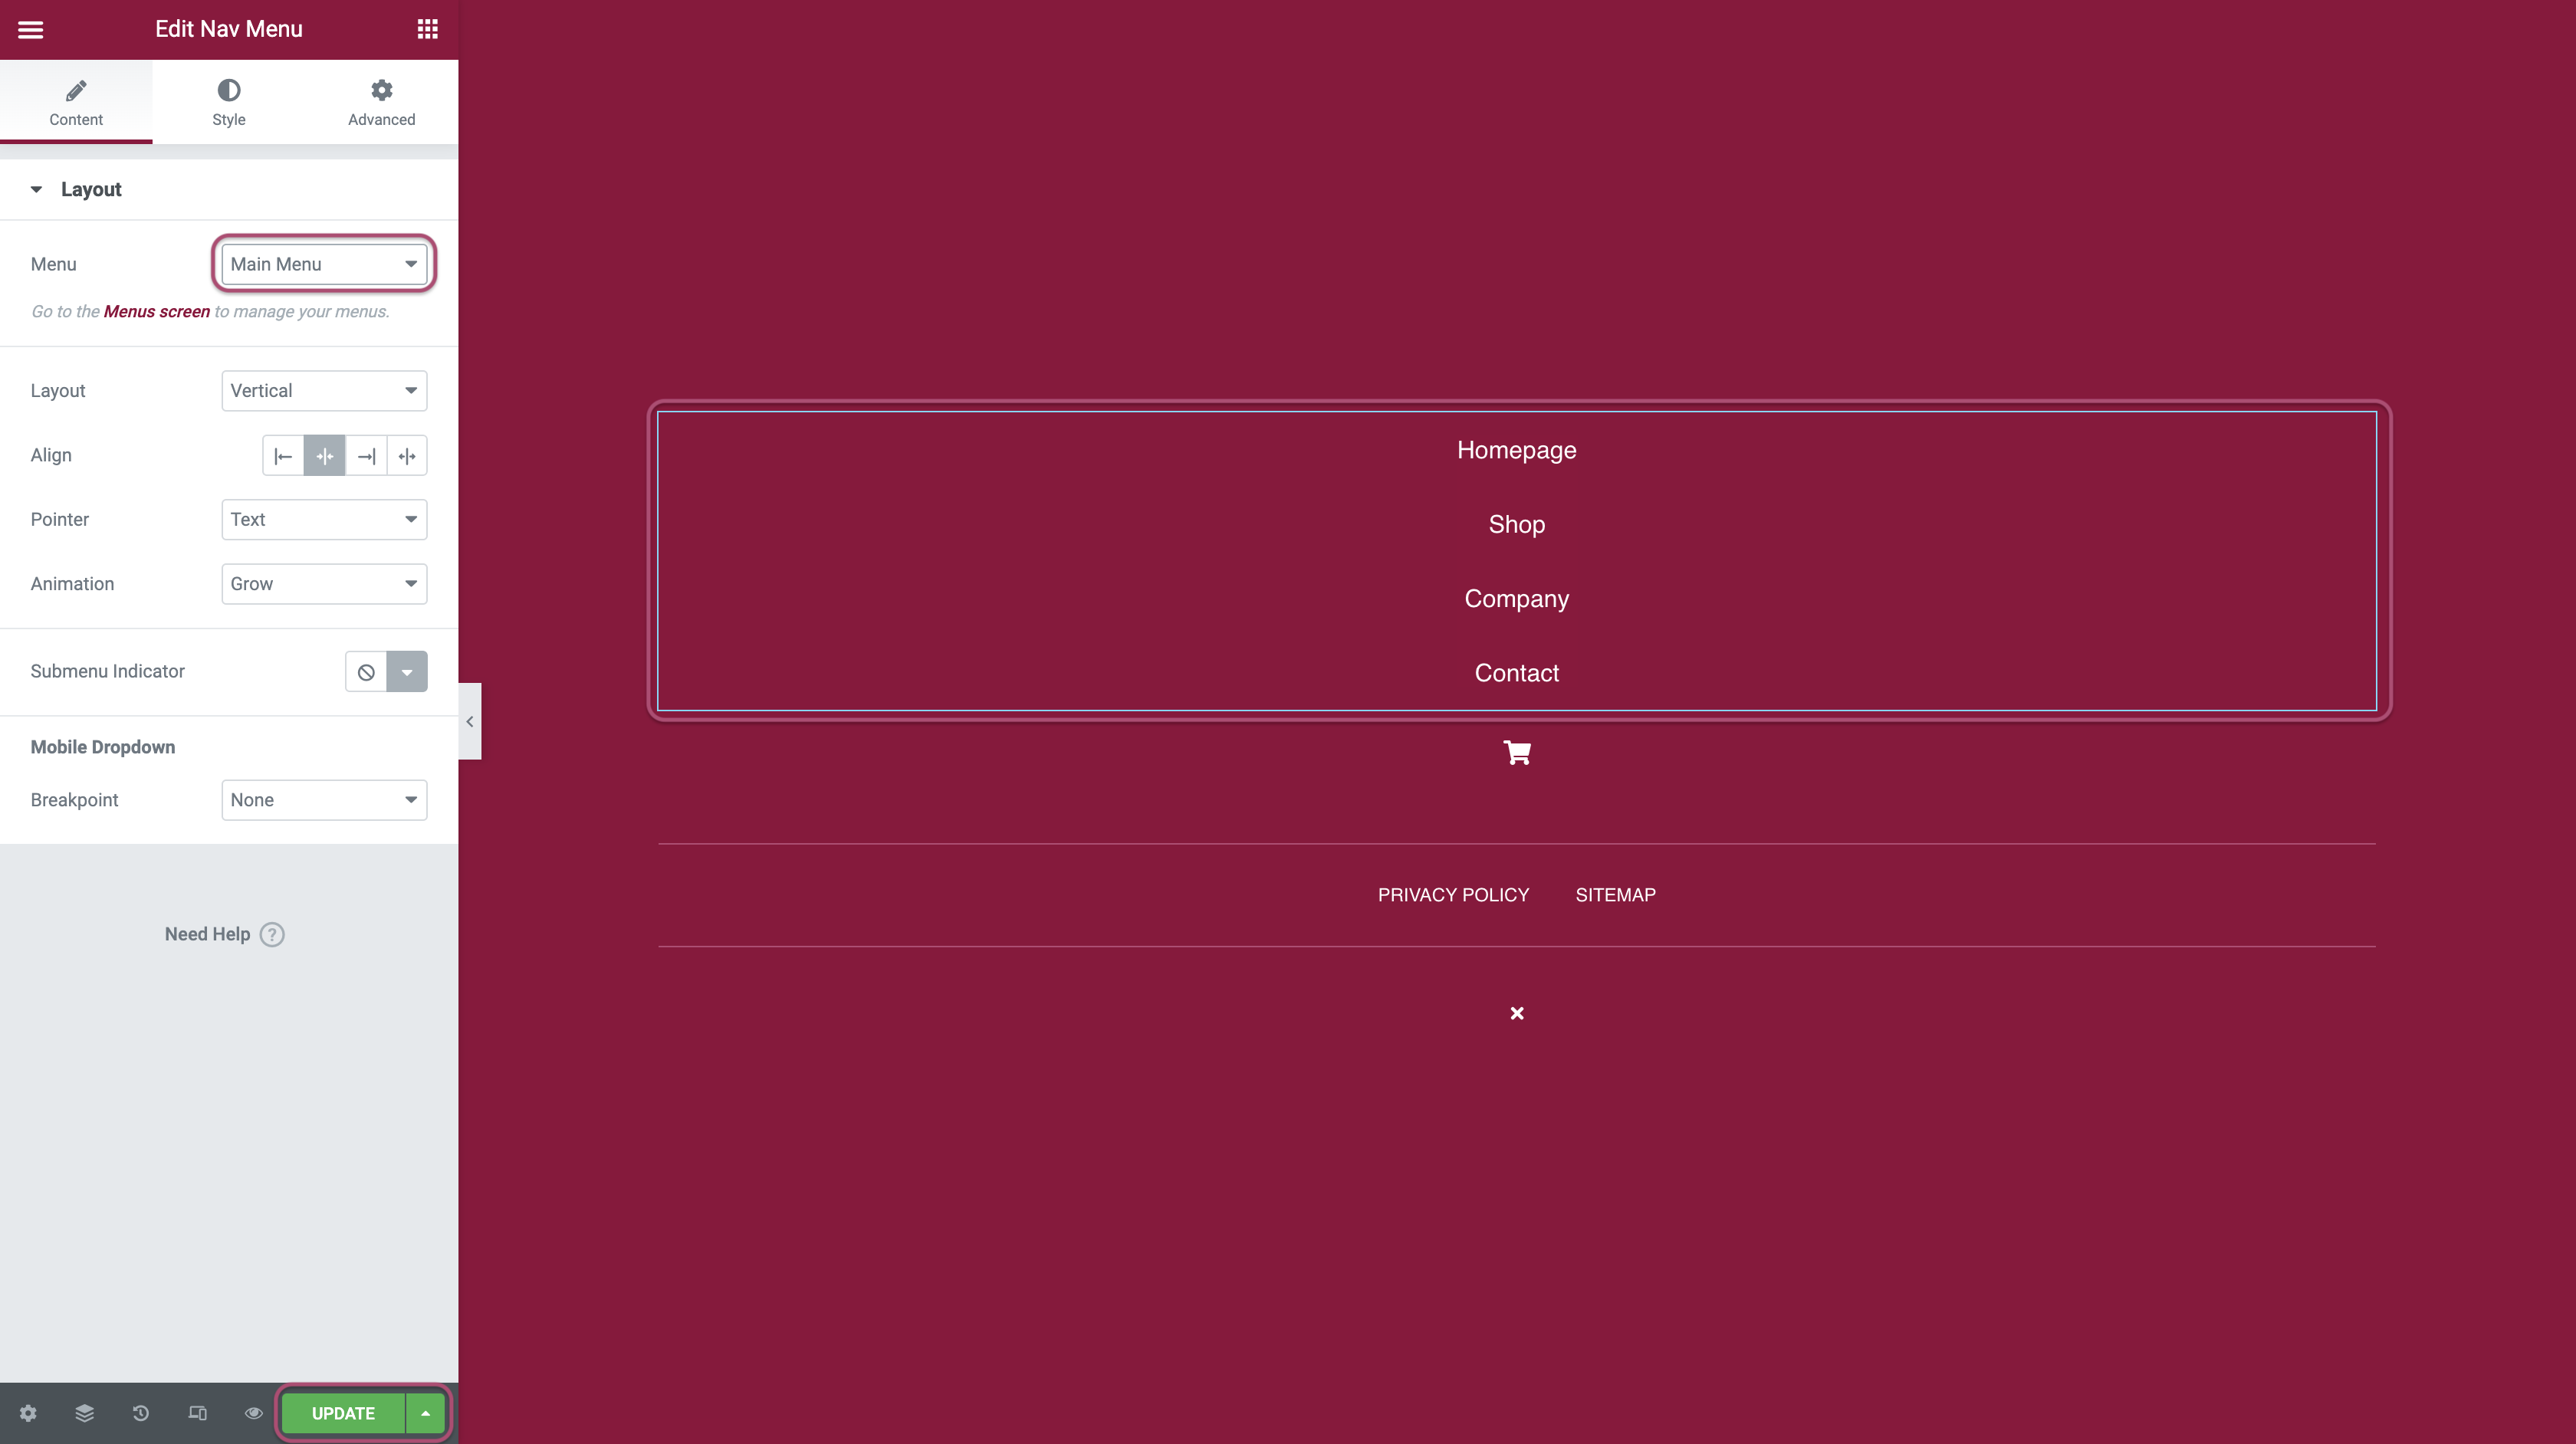
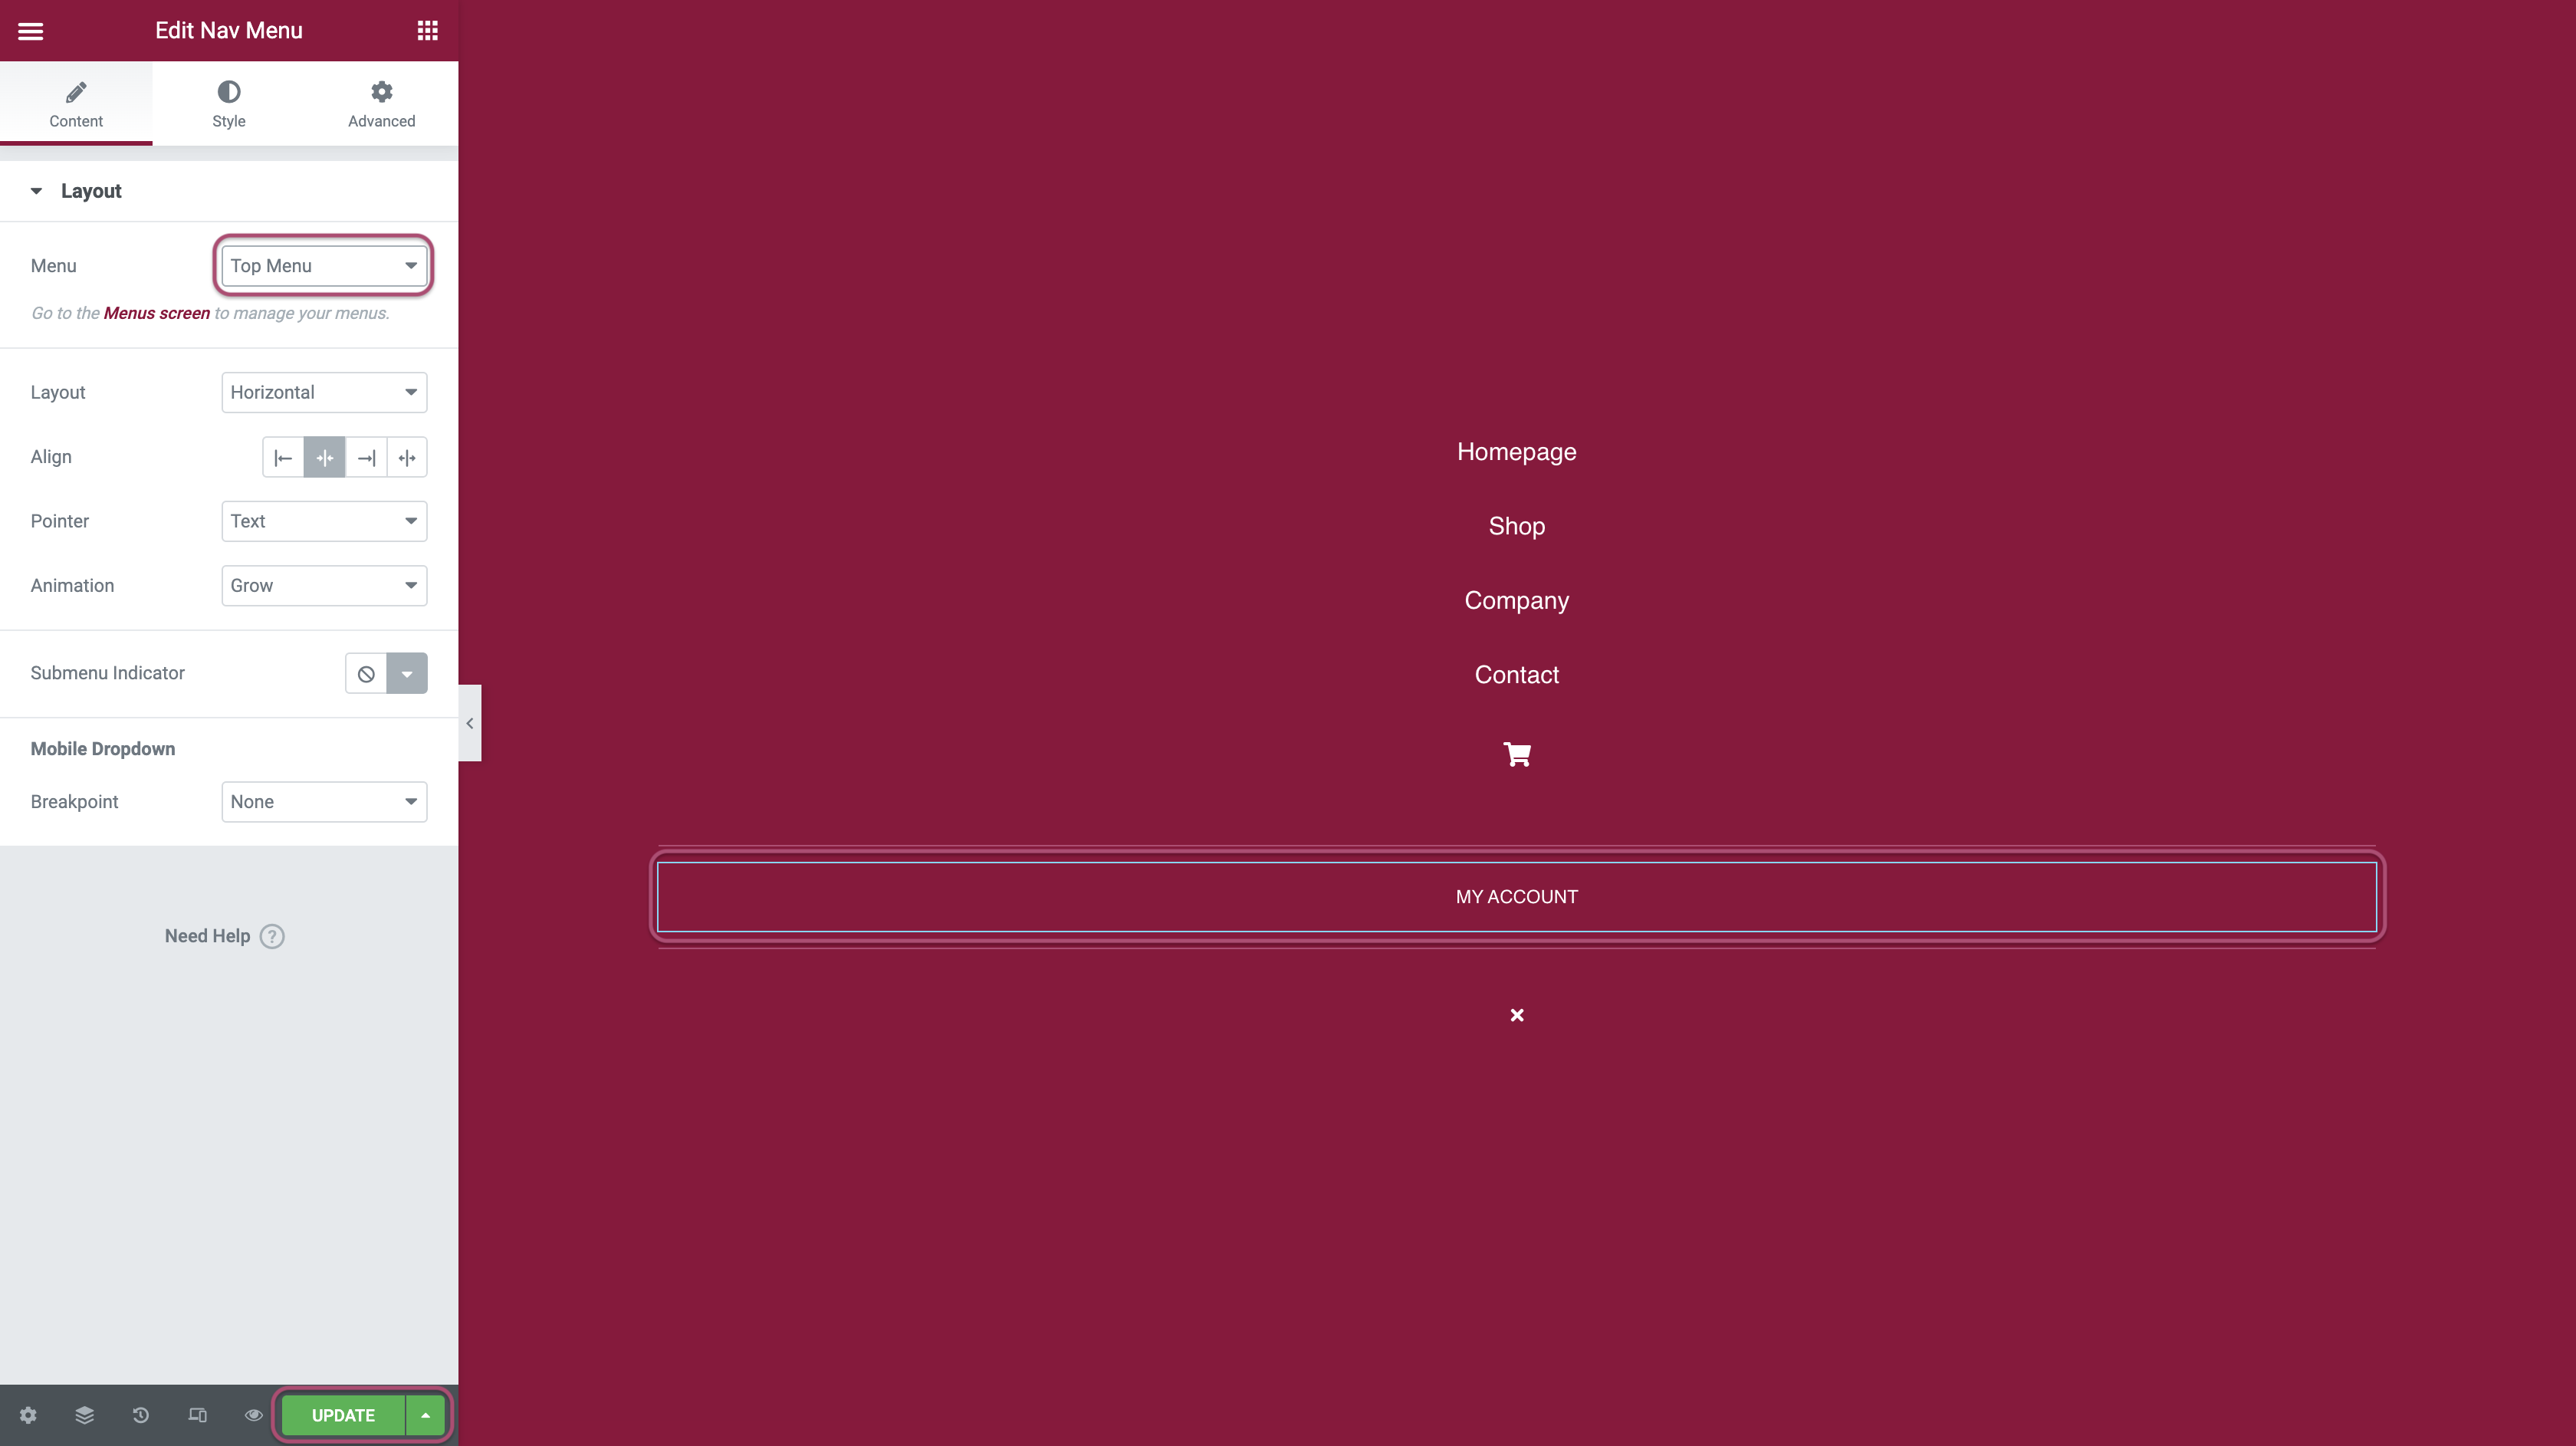
Responsive Menu
Set the menu
- Go to WordPress Admin > Templates > Popups
- Hovering over Responsive Menu > Click on Edit with Elementor
- Set the vertical menu with your Main Menu
- Set the horizontal menu with your Top Menu or Footer Menu
- Click on Update button
Cookies & Popup
Display the popup
- Go to WordPress Admin > Template > Popup
- Hovering over Cookies or Popup > Click on Edit with Elementor
- On the Elementor Panel options > Click on top arrow next to Update button
- Set your appearance preferences:
- Display Conditions
- Triggers
- Advanced Rules
- Click on Update button

Blog
Archive Page
- Go to WordPress Admin > Pages > Add New
- Give the page a name, for exemple: Articles
- Click on Publish button
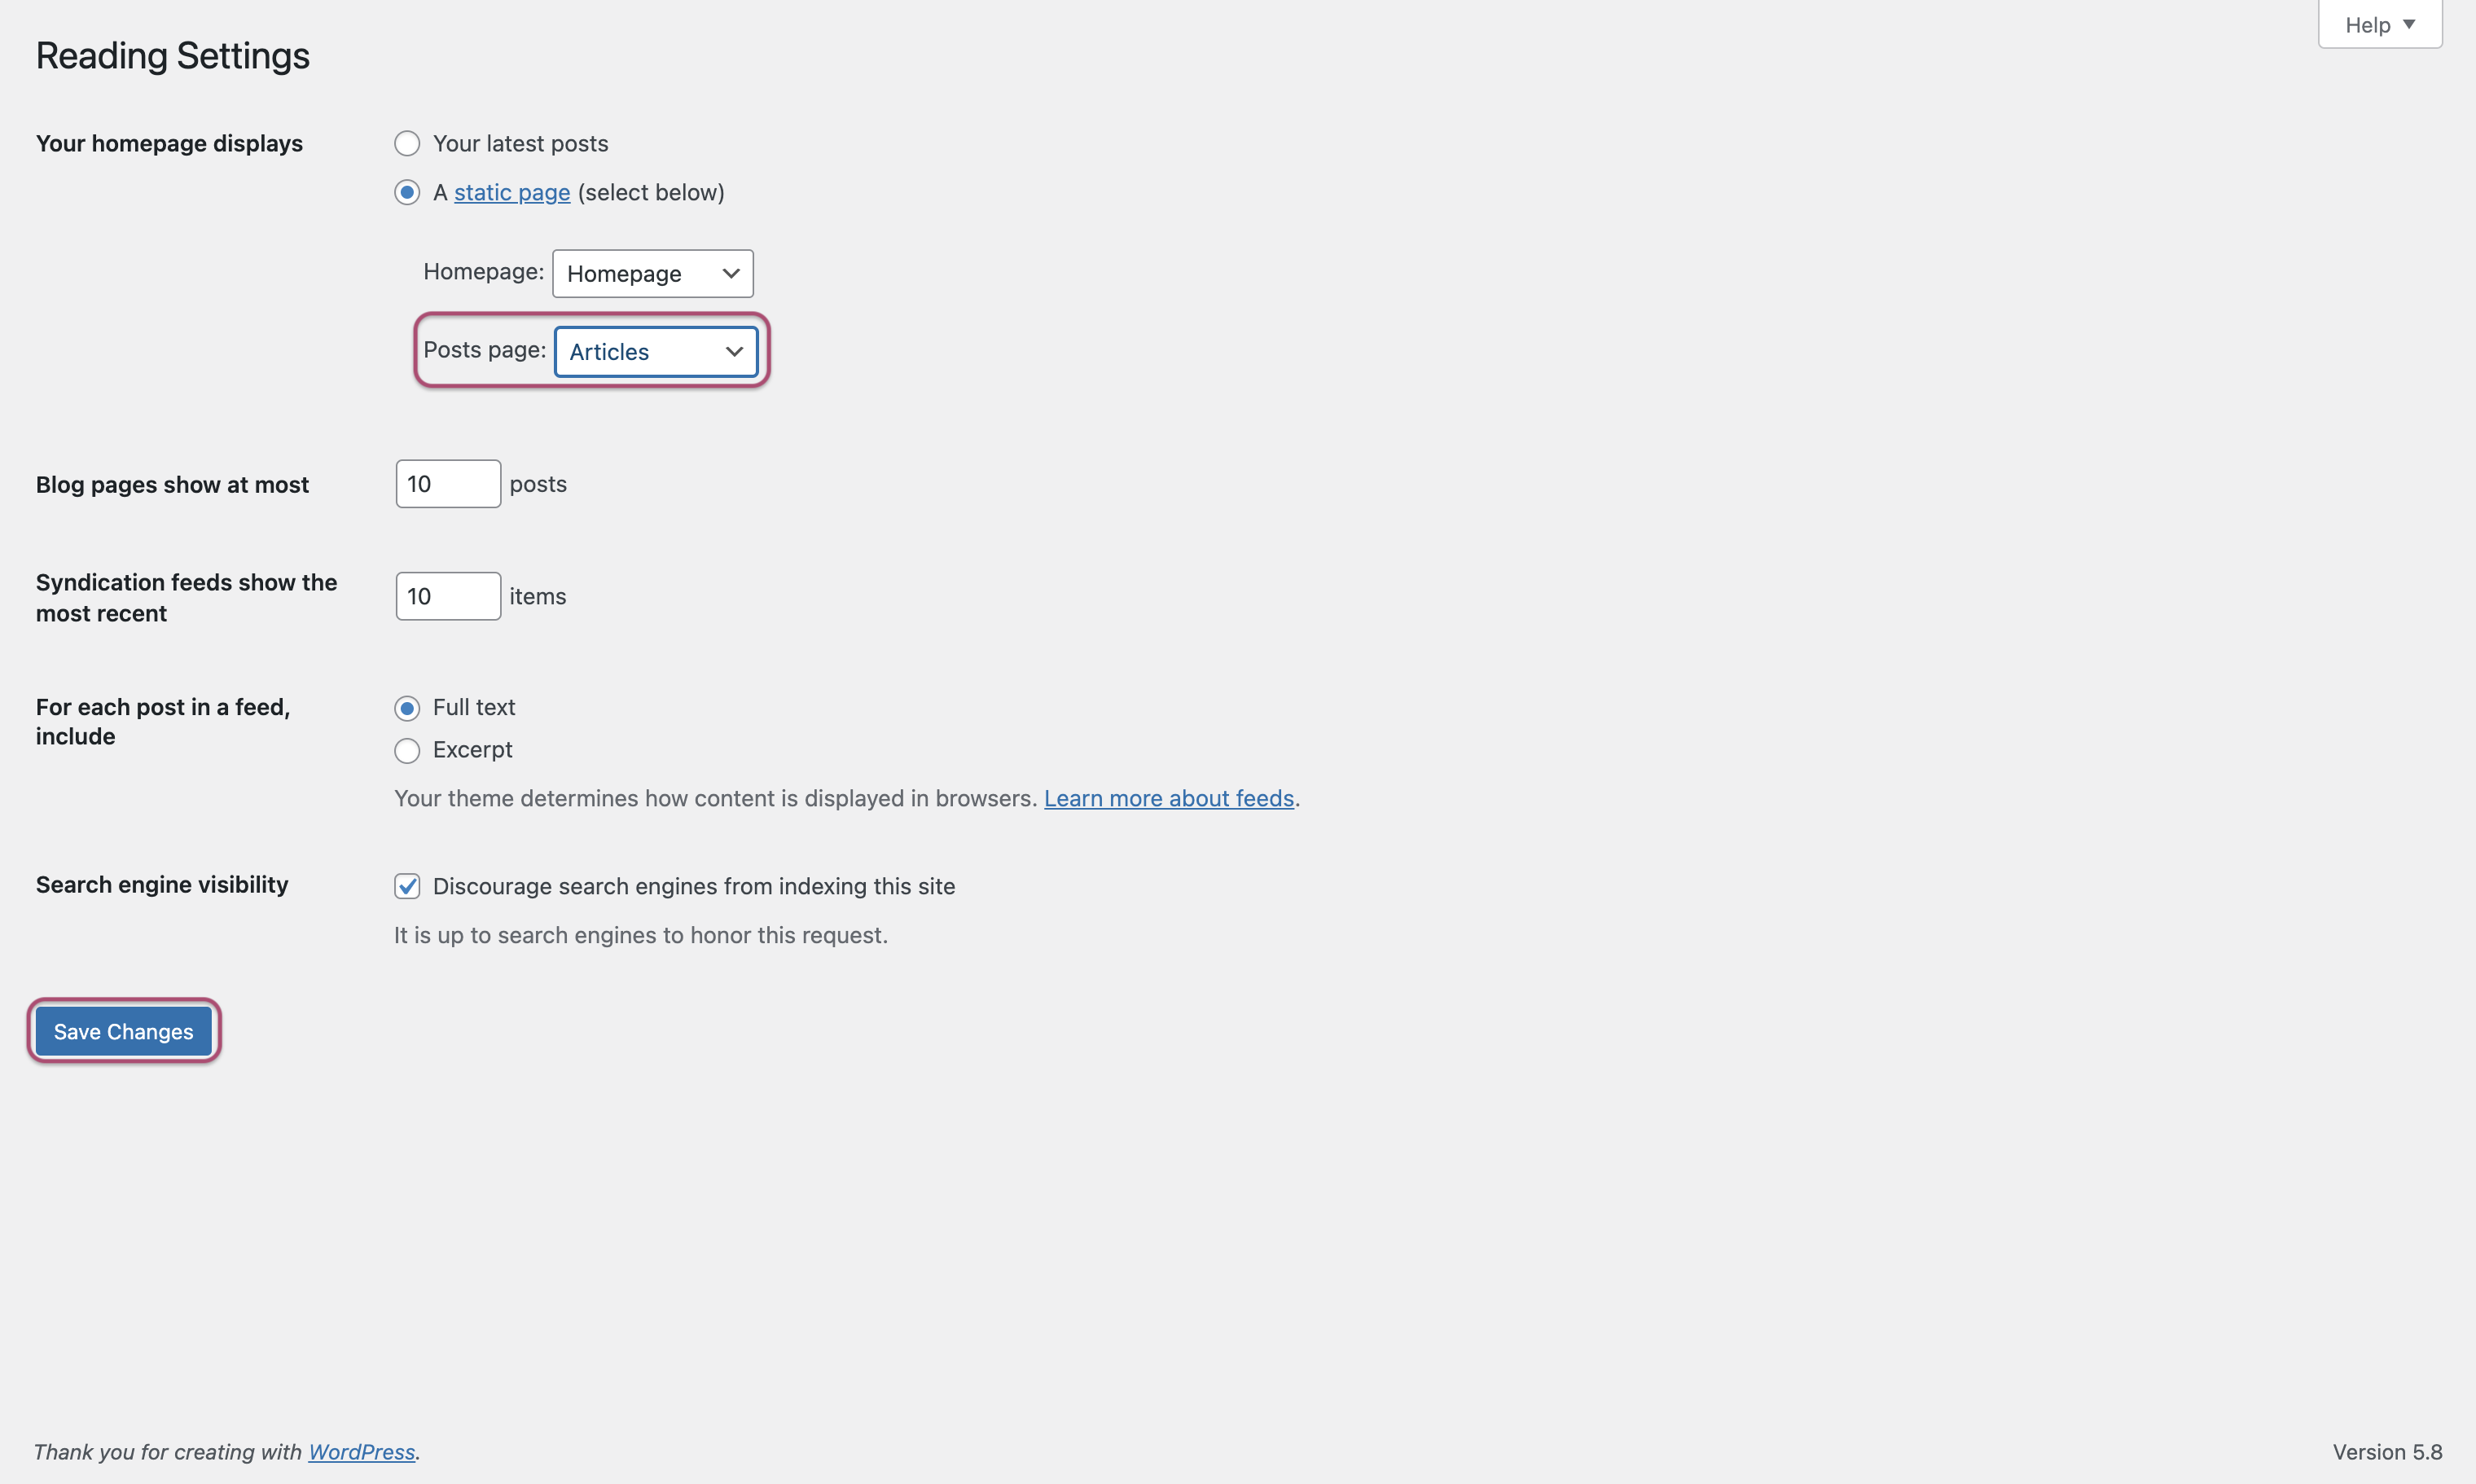
Settings
- Go to WordPress Admin > Settings > Reading
- Select your page as the Posts page.
- Click on Save Change button
Logo & Favicon
Settings
- Go to WordPress Admin > Appearance > Customize
- Go to Site Identity tab
- Select logo and Select site icon
- Click on Publish button
WooCommerce
Plugin Installation
The WooCommerce Plugin from Auttomatic let you create a Shop. Install it if you didn’t do it when you imported the kit.
- Go to WordPress Admin > Plugins > Add New > Upload or Search Plugin
- Click on Install then Activate Plugin
WooCommerce Pages
Delete Default Pages
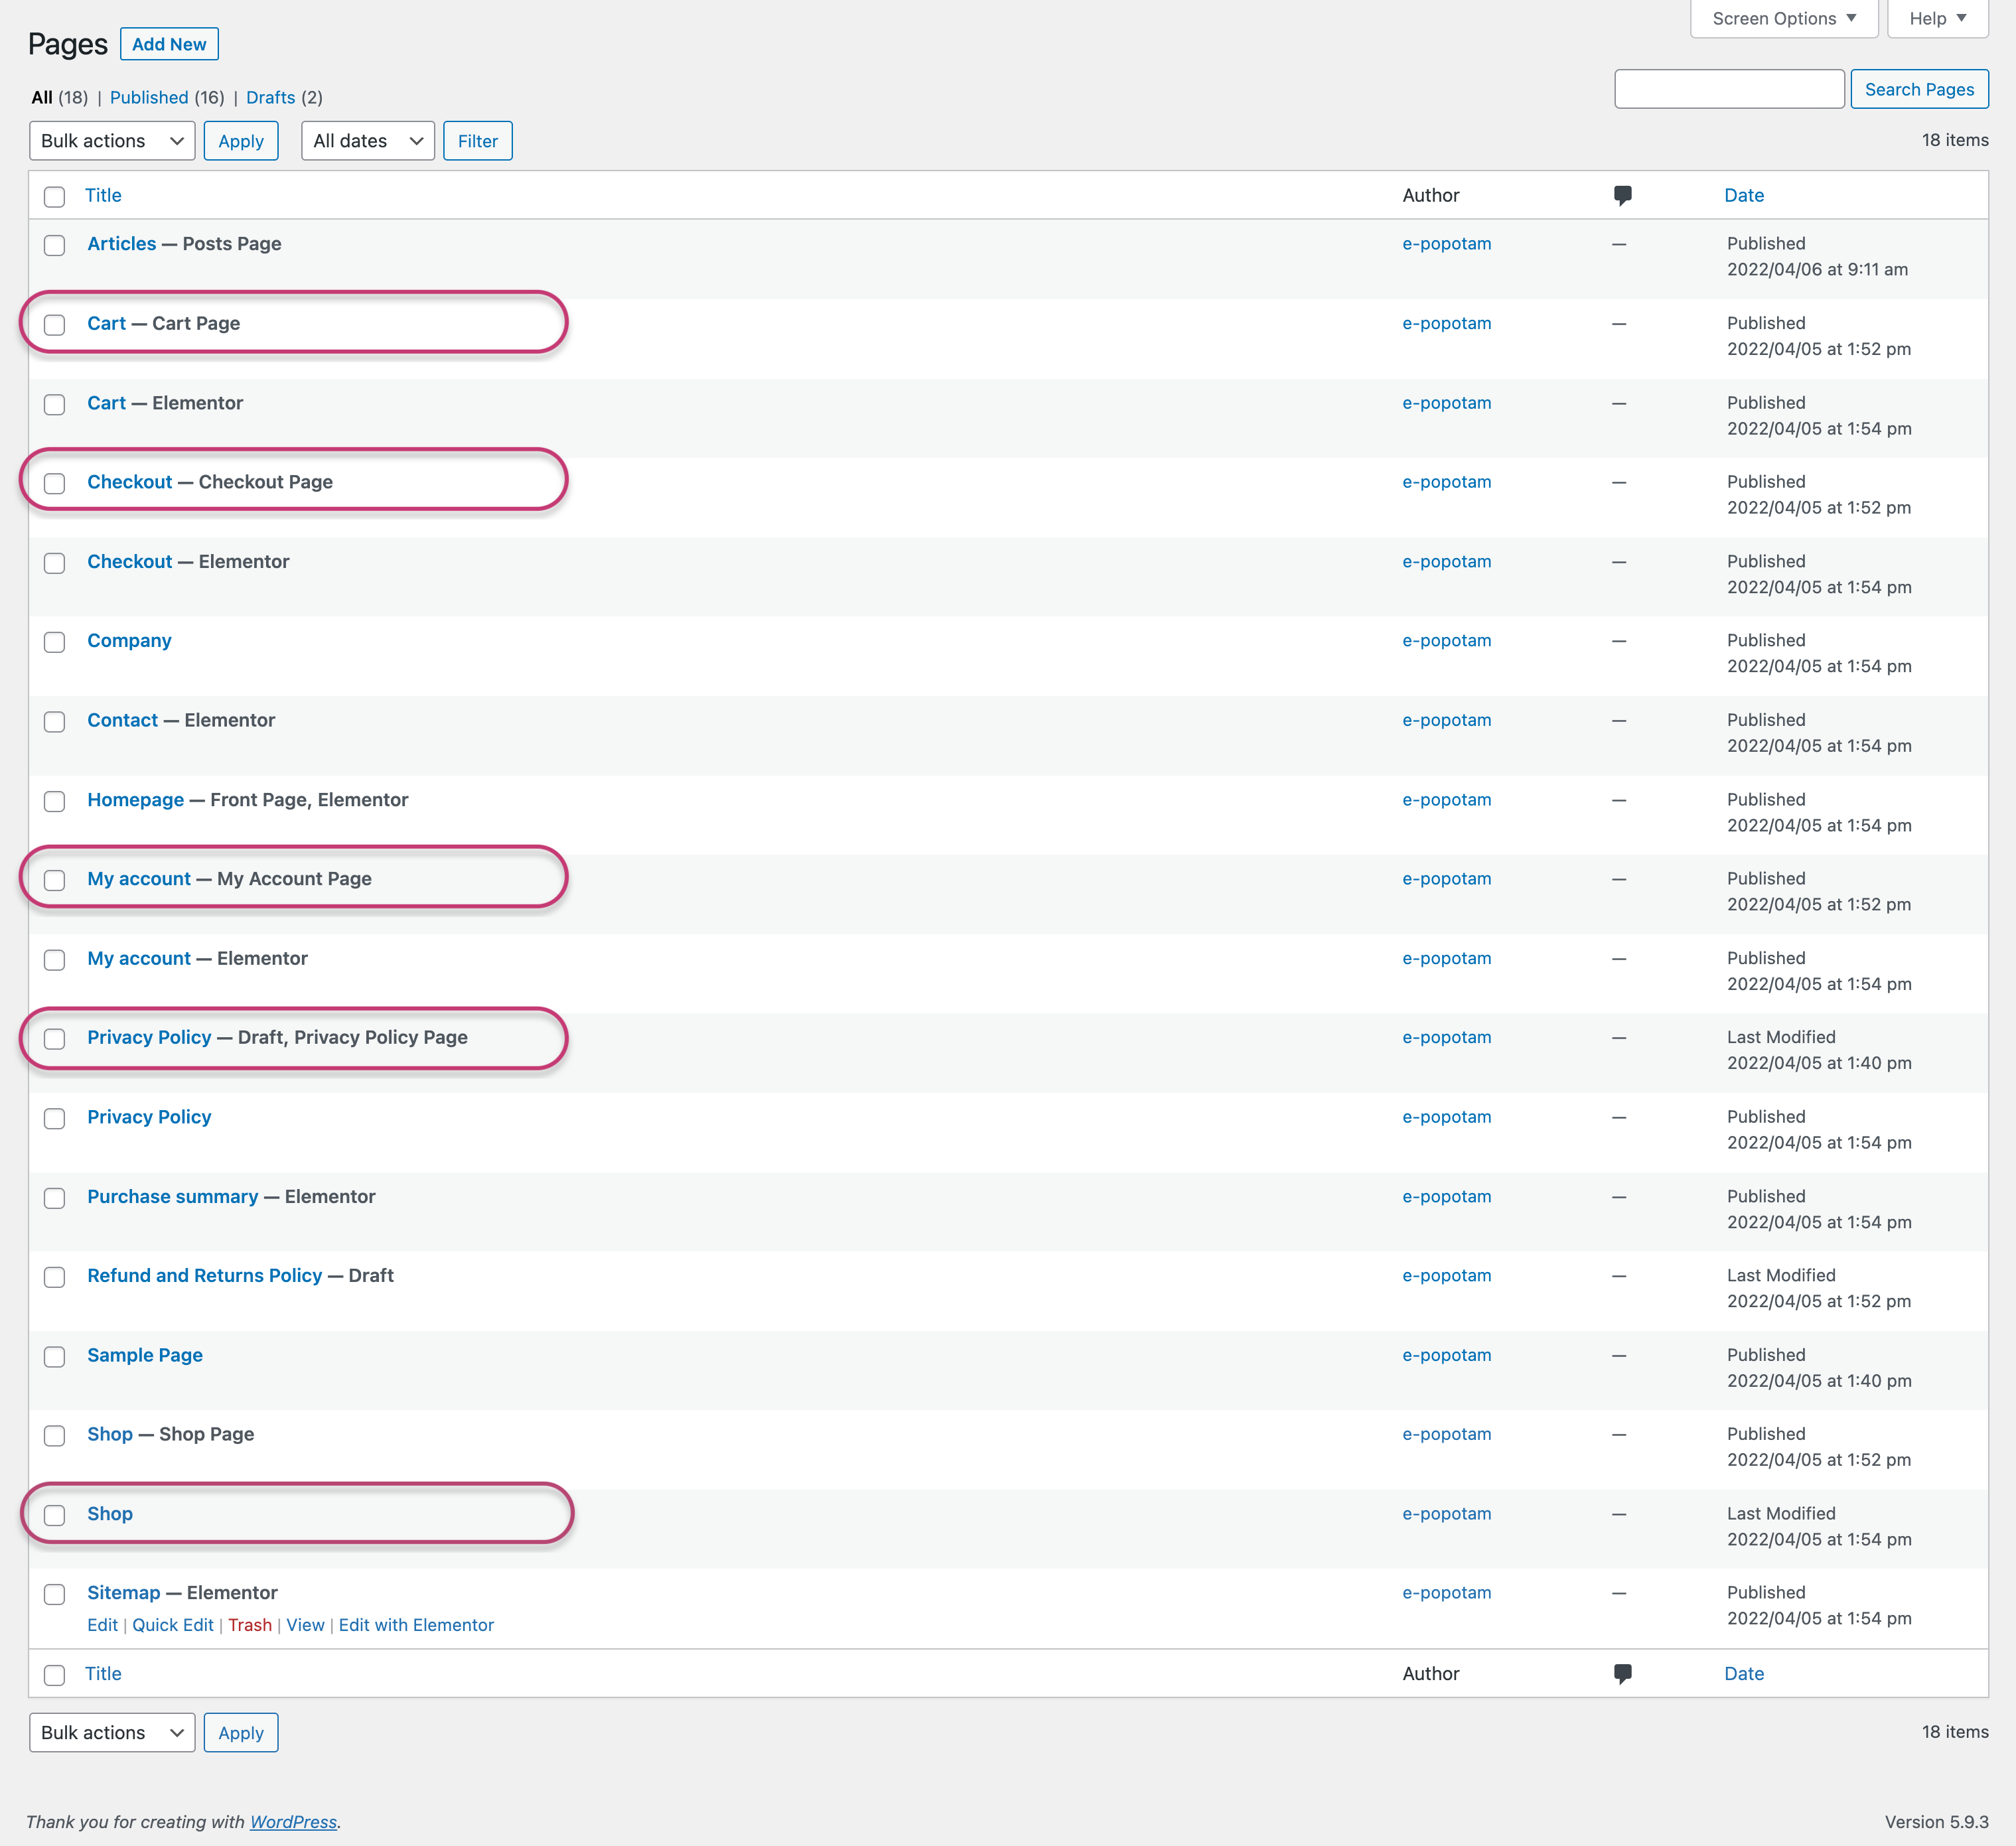
WooCommerce installs the necessary pages by default. You will need to remove them and set our kit pages instead Default Pages.
- Go to WordPress Admin > Pages > All Pages
- Delete the 4 pages with the following grey titles:
- Cart Page
- Checkout Page
- My Account Page
- Privacy Policy Page
- Delete the Shop page without grey title
- Hover over the Pages > Click on Trash
Set Elementor Pages
- Go to WordPress Admin > Template > Saved Templates > choose a page of your choice > Click on Edit with Elementor
- In Elementor panel bar > Click on 3 bars menu icon > Click on Site Settings tab > Click on WooCommerce tab
- Select Elementor Pages as Default Pages
- Click on Update button

Well done! You're ready to use your shop!
Portfolio
CPT UI Plugin Installation
The Custom Post Type UI (CPT UI) Plugin from WebDevStudios let you create a Portfolio Post Type. Install it if you didn’t do it when you imported the kit.
- Go to WordPress Admin > Plugins > Add New > Upload or Search Plugin
- Click on Install then Activate Plugin
- Create your own settings or…
Import Custom Post Type
- Go to WordPress Admin > CPT UI > Tools > Post Types tab
- Copy the following code > Paste it in Import Post Types field > Click on Import button
{"portfolio":{"name":"portfolio","label":"Projects","singular_label":"Project","description":"","public":"true","publicly_queryable":"true","show_ui":"true","show_in_nav_menus":"true","delete_with_user":"false","show_in_rest":"true","rest_base":"","rest_controller_class":"","has_archive":"true","has_archive_string":"","exclude_from_search":"false","capability_type":"post","hierarchical":"false","rewrite":"true","rewrite_slug":"","rewrite_withfront":"false","query_var":"true","query_var_slug":"","menu_position":"5","show_in_menu":"true","show_in_menu_string":"","menu_icon":"dashicons-images-alt2","supports":["title","thumbnail"],"taxonomies":["portfolio_category"],"labels":{"menu_name":"Portfolio","all_items":"Projects","add_new":"Add New","add_new_item":"Add New Project","edit_item":"Edit Project","new_item":"New Project","view_item":"View Project","view_items":"View Projects","search_items":"Search Project","not_found":"No Project found","not_found_in_trash":"No Project found in trash","parent":"Parent Project","featured_image":"Featured image for this Project","set_featured_image":"Set featured image for this Project","remove_featured_image":"Remove featured image for this Project","use_featured_image":"Use as featured image for this Project","archives":"Project archives","insert_into_item":"Insert into Project","uploaded_to_this_item":"Uploaded to this Project","filter_items_list":"Filter Projects list","items_list_navigation":"Projects list navigation","items_list":"Projects List","attributes":"Projects Attributes","name_admin_bar":"Project","item_published":"Project published","item_published_privately":"Project published privately","item_reverted_to_draft":"Project reverted to draft","item_scheduled":"Project scheduled","item_updated":"Project updated","parent_item_colon":"Parent Project"},"custom_supports":""}}
Import Taxonomies
You can also import Taxonomies to get Categories for your Portfolio Post Type.
- Go to WordPress Admin > CPT UI > Tools > Taxonomies tab
- Copy the following code > Paste it in Import Taxonomies field > Click on Import button
{"portfolio_category":{"name":"portfolio_category","label":"Categories","singular_label":"Category","description":"","public":"true","publicly_queryable":"true","hierarchical":"true","show_ui":"true","show_in_menu":"true","show_in_nav_menus":"true","query_var":"true","query_var_slug":"","rewrite":"true","rewrite_slug":"","rewrite_withfront":"1","rewrite_hierarchical":"0","show_admin_column":"false","show_in_rest":"true","show_tagcloud":"false","show_in_quick_edit":"","rest_base":"","rest_controller_class":"","labels":{"menu_name":"","all_items":"","edit_item":"","view_item":"","update_item":"","add_new_item":"","new_item_name":"","parent_item":"","parent_item_colon":"","search_items":"","popular_items":"","separate_items_with_commas":"","add_or_remove_items":"","choose_from_most_used":"","not_found":"","no_terms":"","items_list_navigation":"","items_list":"","back_to_items":""},"meta_box_cb":"","default_term":"","object_types":["portfolio"]}}
ACF Plugin Installation
The Advanced Custom Field (ACF) Plugin from Delicious Brains let you create a Portfolio Post Type. Install it if you didn’t do it when you imported the kit.
- Go to WordPress Admin > Plugins > Add New > Upload or Search Plugin
- Click on Install then Activate Plugin
- Create your own settings or…
Import Custom Fields
We offer you a template with the following fields:
- Project Title
- Client Name
- Project Date
- Title Link
- URL Link
- Description
- Gallery (up to 6 pictures)
- Go to WordPress Admin > Custom Fields > Tools
- Unzip our Kit‘s zip file > Use epptm-acf-portfolio.json file…
- …or Create a .json file with the following code
- Import the .json file in Import Field Groups section > Click on Import File button
[{"key":"group_60f7e81a25719","title":"Portfolio","fields":[{"key":"field_60f7f0acdf318","label":"Client","name":"client","type":"text","instructions":"","required":0,"conditional_logic":0,"wrapper":{"width":"50","class":"","id":""},"default_value":"","placeholder":"","prepend":"","append":"","maxlength":""},{"key":"field_60f7f60920d99","label":"Date","name":"date","type":"date_picker","instructions":"","required":0,"conditional_logic":0,"wrapper":{"width":"50","class":"","id":""},"display_format":"d\/m\/Y","return_format":"d\/m\/Y","first_day":1},{"key":"field_60f7fb9646f30","label":"Title link","name":"title_link","type":"text","instructions":"","required":0,"conditional_logic":0,"wrapper":{"width":"50","class":"","id":""},"default_value":"","placeholder":"","prepend":"","append":"","maxlength":""},{"key":"field_60f7f63020d9c","label":"URL link","name":"url","type":"text","instructions":"","required":0,"conditional_logic":0,"wrapper":{"width":"50","class":"","id":""},"default_value":"","placeholder":"","prepend":"","append":"","maxlength":""},{"key":"field_60f7e86e353bc","label":"Description","name":"description","type":"wysiwyg","instructions":"","required":0,"conditional_logic":0,"wrapper":{"width":"100","class":"","id":""},"default_value":"","tabs":"visual","toolbar":"full","media_upload":1,"delay":0},{"key":"field_61c2f49d8ffda","label":"Photo 1","name":"photo_1","type":"image","instructions":"","required":0,"conditional_logic":0,"wrapper":{"width":"33","class":"","id":""},"return_format":"array","preview_size":"large","library":"all","min_width":"","min_height":"","min_size":"","max_width":"","max_height":"","max_size":"","mime_types":""},{"key":"field_61c2f4df8ffdb","label":"Photo 2","name":"photo_2","type":"image","instructions":"","required":0,"conditional_logic":0,"wrapper":{"width":"33","class":"","id":""},"return_format":"array","preview_size":"large","library":"all","min_width":"","min_height":"","min_size":"","max_width":"","max_height":"","max_size":"","mime_types":""},{"key":"field_61c2f4e78ffde","label":"Photo 3","name":"photo_3","type":"image","instructions":"","required":0,"conditional_logic":0,"wrapper":{"width":"33","class":"","id":""},"return_format":"array","preview_size":"large","library":"all","min_width":"","min_height":"","min_size":"","max_width":"","max_height":"","max_size":"","mime_types":""},{"key":"field_61c2f4e68ffdd","label":"Photo 4","name":"photo_4","type":"image","instructions":"","required":0,"conditional_logic":0,"wrapper":{"width":"33","class":"","id":""},"return_format":"array","preview_size":"large","library":"all","min_width":"","min_height":"","min_size":"","max_width":"","max_height":"","max_size":"","mime_types":""},{"key":"field_61c2f4e58ffdc","label":"Photo 5","name":"photo_5","type":"image","instructions":"","required":0,"conditional_logic":0,"wrapper":{"width":"33","class":"","id":""},"return_format":"array","preview_size":"large","library":"all","min_width":"","min_height":"","min_size":"","max_width":"","max_height":"","max_size":"","mime_types":""},{"key":"field_61c2f5038ffdf","label":"Photo 6","name":"photo_6","type":"image","instructions":"","required":0,"conditional_logic":0,"wrapper":{"width":"33","class":"","id":""},"return_format":"array","preview_size":"large","library":"all","min_width":"","min_height":"","min_size":"","max_width":"","max_height":"","max_size":"","mime_types":""}],"location":[[{"param":"post_type","operator":"==","value":"portfolio"}]],"menu_order":0,"position":"acf_after_title","style":"seamless","label_placement":"top","instruction_placement":"label","hide_on_screen":["the_content","excerpt","discussion","comments","revisions","author","format","page_attributes","send-trackbacks"],"active":true,"description":"","show_in_rest":0}]
Portfolio Archive Page
- Go to WordPress Admin > Templates > Saved Templates > All
- Hovering over Portfolio > Edit with Elementor
- Select the Portfolio element
- In Elementor panel options > in Query section > Select the Projects source
- Click on Update button

- Go to WordPress Admin > Appearance > Menus > Main Menu
- On Projects tab > Add to Menu Projects Archives
- Rename it if you want
- Click on Save Menu button

Project Page
- Go to WordPress Admin > Templates > Saved Templates > All
- Hovering over Project > Edit with Elementor
- Click on Post Info block

Client info
- Click on second element in Elementor panel > In Custom field > Click on Dynamic Tags > Select ACF Field
- Click on ACF Field > Select Client as key

Date info
- Click on third element > In Custom field > Click on Dynamic Tags > Select ACF Field
- Click on ACF Field > Select Date as key
Link info
- Click on forth element > In Custom field > Click on Dynamic Tags > Select ACF Field
- Click on ACF Field > Select Title link as key
- In Custom Link field > Click on Dynamic Tags > Select ACF Field
- Click on ACF Field > Select URL link as key
Images
- Click on firth thumbnail > On Image field > Click on Dynamic Tags > Select ACF Image Field
- Click on ACF Field > Select Photo 1 as key
- and so on for the other images…
Description
- Click on Text Editor block > Click on Dynamic Tags > Select ACF Field
- Click on ACF Field > Select Description as key
Other projects
- Click on Posts block > In Query section > Select Projects as source
- Click on Save & Close button
Well done! You're ready to use your portfolio!
CSS Snippets
These code parts were automatically added to the Custom CSS section in Site Settings.
For a better use, we already added the .epptm-menu class to the Header section in our Starter Kit.
Resize Header when scrolling
This code resize the Header when you scroll the page. The resize affect the logo but you can adapte it on a other part.
					/* Resize Header */
.epptm-menu.elementor-sticky--effects .elementor-widget-image img {
    height: 50px !important;
    width: auto;
    transition: 1s all ease-in-out;
}
Change Header color when scrolling
This code change the Header color when you scroll the page.
In this case, you will have a menu that becomes slightly transparent when the page is scrolled.
					/* Change Header Color */
.epptm-menu.elementor-sticky--effects {
    background-color: #FFFFFFF0 !important;
    transition: 1s all ease-in-out;
}
Fix Banner background-position
It seems Elementor don’t like the background-position style on the banner featured image. If you see a display problem, you can use this part of code to fix it.
					/* Fix Banner background-position */
.elementor-section.elementor-top-section.elementor-element {
    background-position: center center;
    background-size: cover;
}
Fix Cart and Checkout Button Style
In case you use woocommerce, this code prevents an unexpected color. It change the button style in Cart and Checkout pages.
					.button.wc-backward {     background-color: transparent !important;
    padding: 0 !important;
    font-weight: normal !important;
    font-size: 16px !important;
}
Fix Menu Cart Button Color on focus
In case you use woocommerce, this code prevents an unexpected color. It change the Cart icon color in the Header menu when you click and leave the button.
					/* Fix Menu Cart Button Focus Color */
a.elementor-menu-cart__toggle_button.elementor-button:focus {
    background-color: transparent !important;
}
JS Snippets
Close popup Menu after click
If you use Anchor in your popup menu, you will have a problem with the popup closing when the links are clicked. To solve this problem, use the following code.
- Go to WordPress Admin > Elementor > Custom Code
- Click on Add new
- Paste following code in head section
- Click on Publish
					<script>
jQuery(function($){
    $(document).on('click','.elementor-location-popup a', function(event){
    elementorProFrontend.modules.popup.closePopup( {}, event);
    });
});
</script>
This code is generic and will close any popup on an anchor click, so you might want to adjust the selector .elementor-location-popup a to something more specific.
Troubleshooting
Display Problems
Recreate Elementor Default Kit
For some unknown reason, sometimes you need to manually recreate the Elementor Default kit file.
Firstly check in WordPress Admin > Templates > Theme Builder if there is a Default kit.
If the Default kit file exists but your website does not look like our template, delete it and follow the three steps below.
If the file does not exist, also follow these three steps:
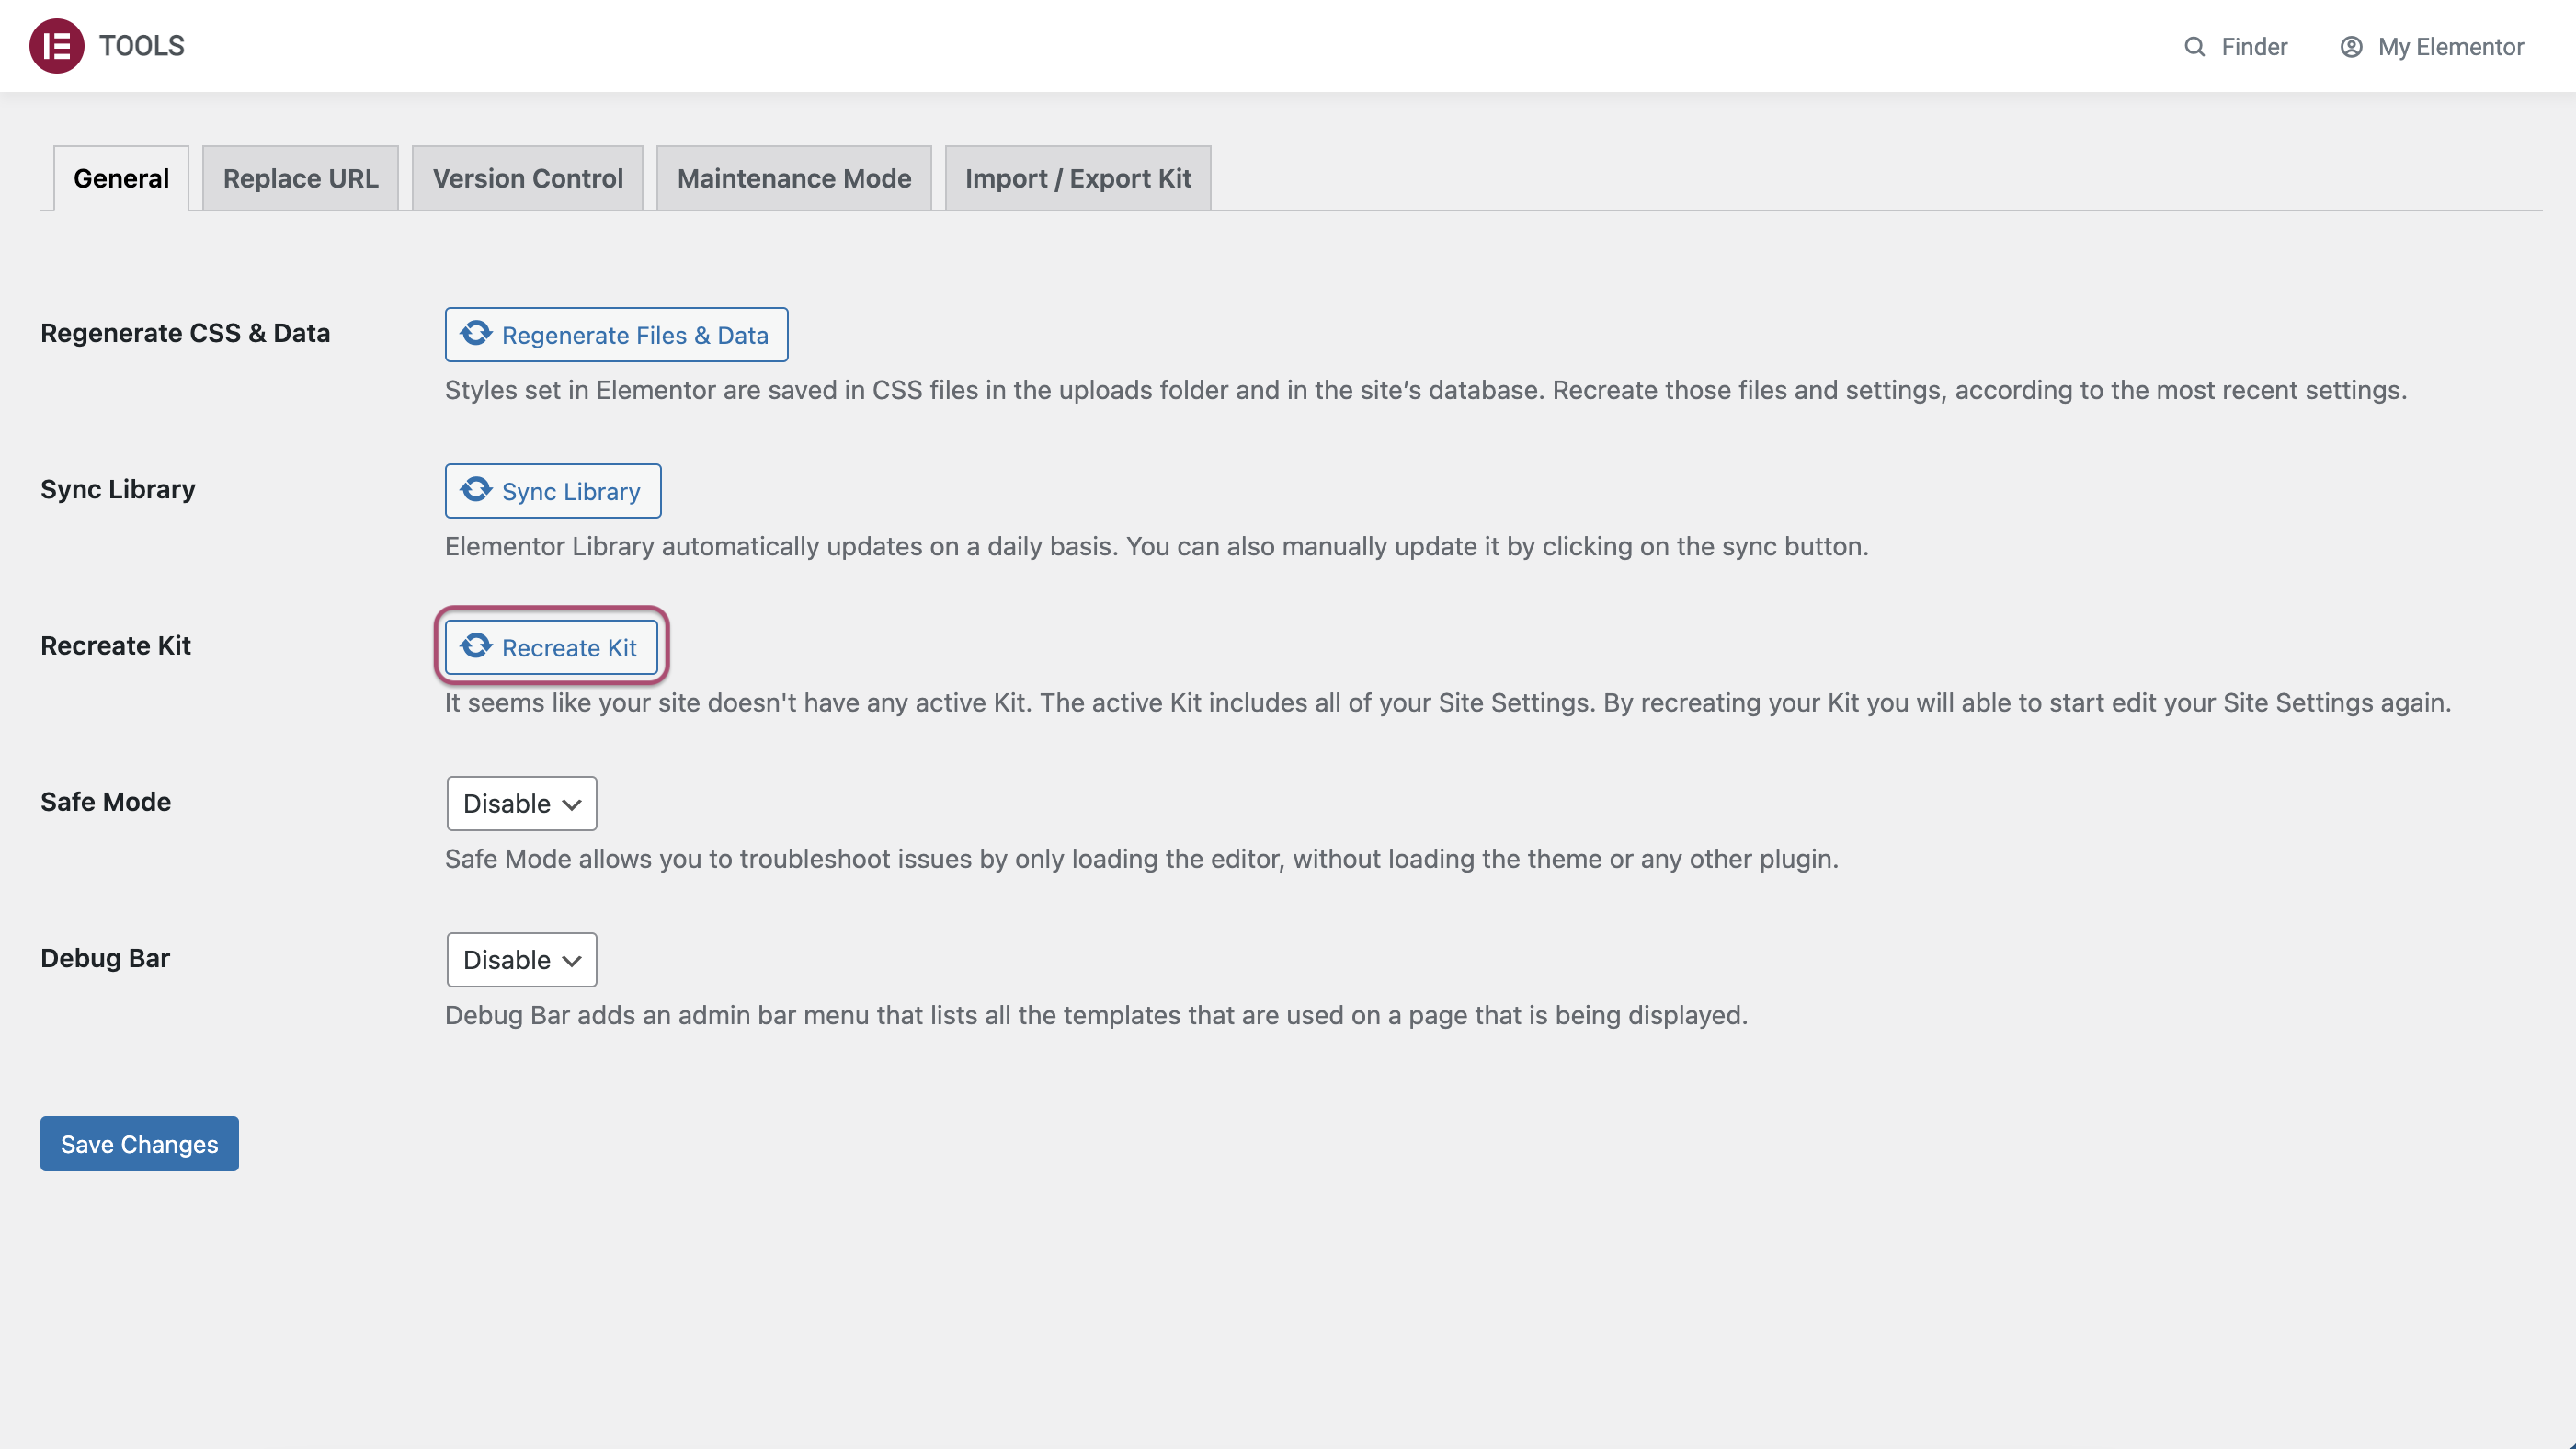
- Go to WordPress Admin > Elementor > Tools
- On General tab, click on Recreate Kit button
- Click on Save Changes button
Re-import Site Settings
And now, you need to import again our Default kit settings.
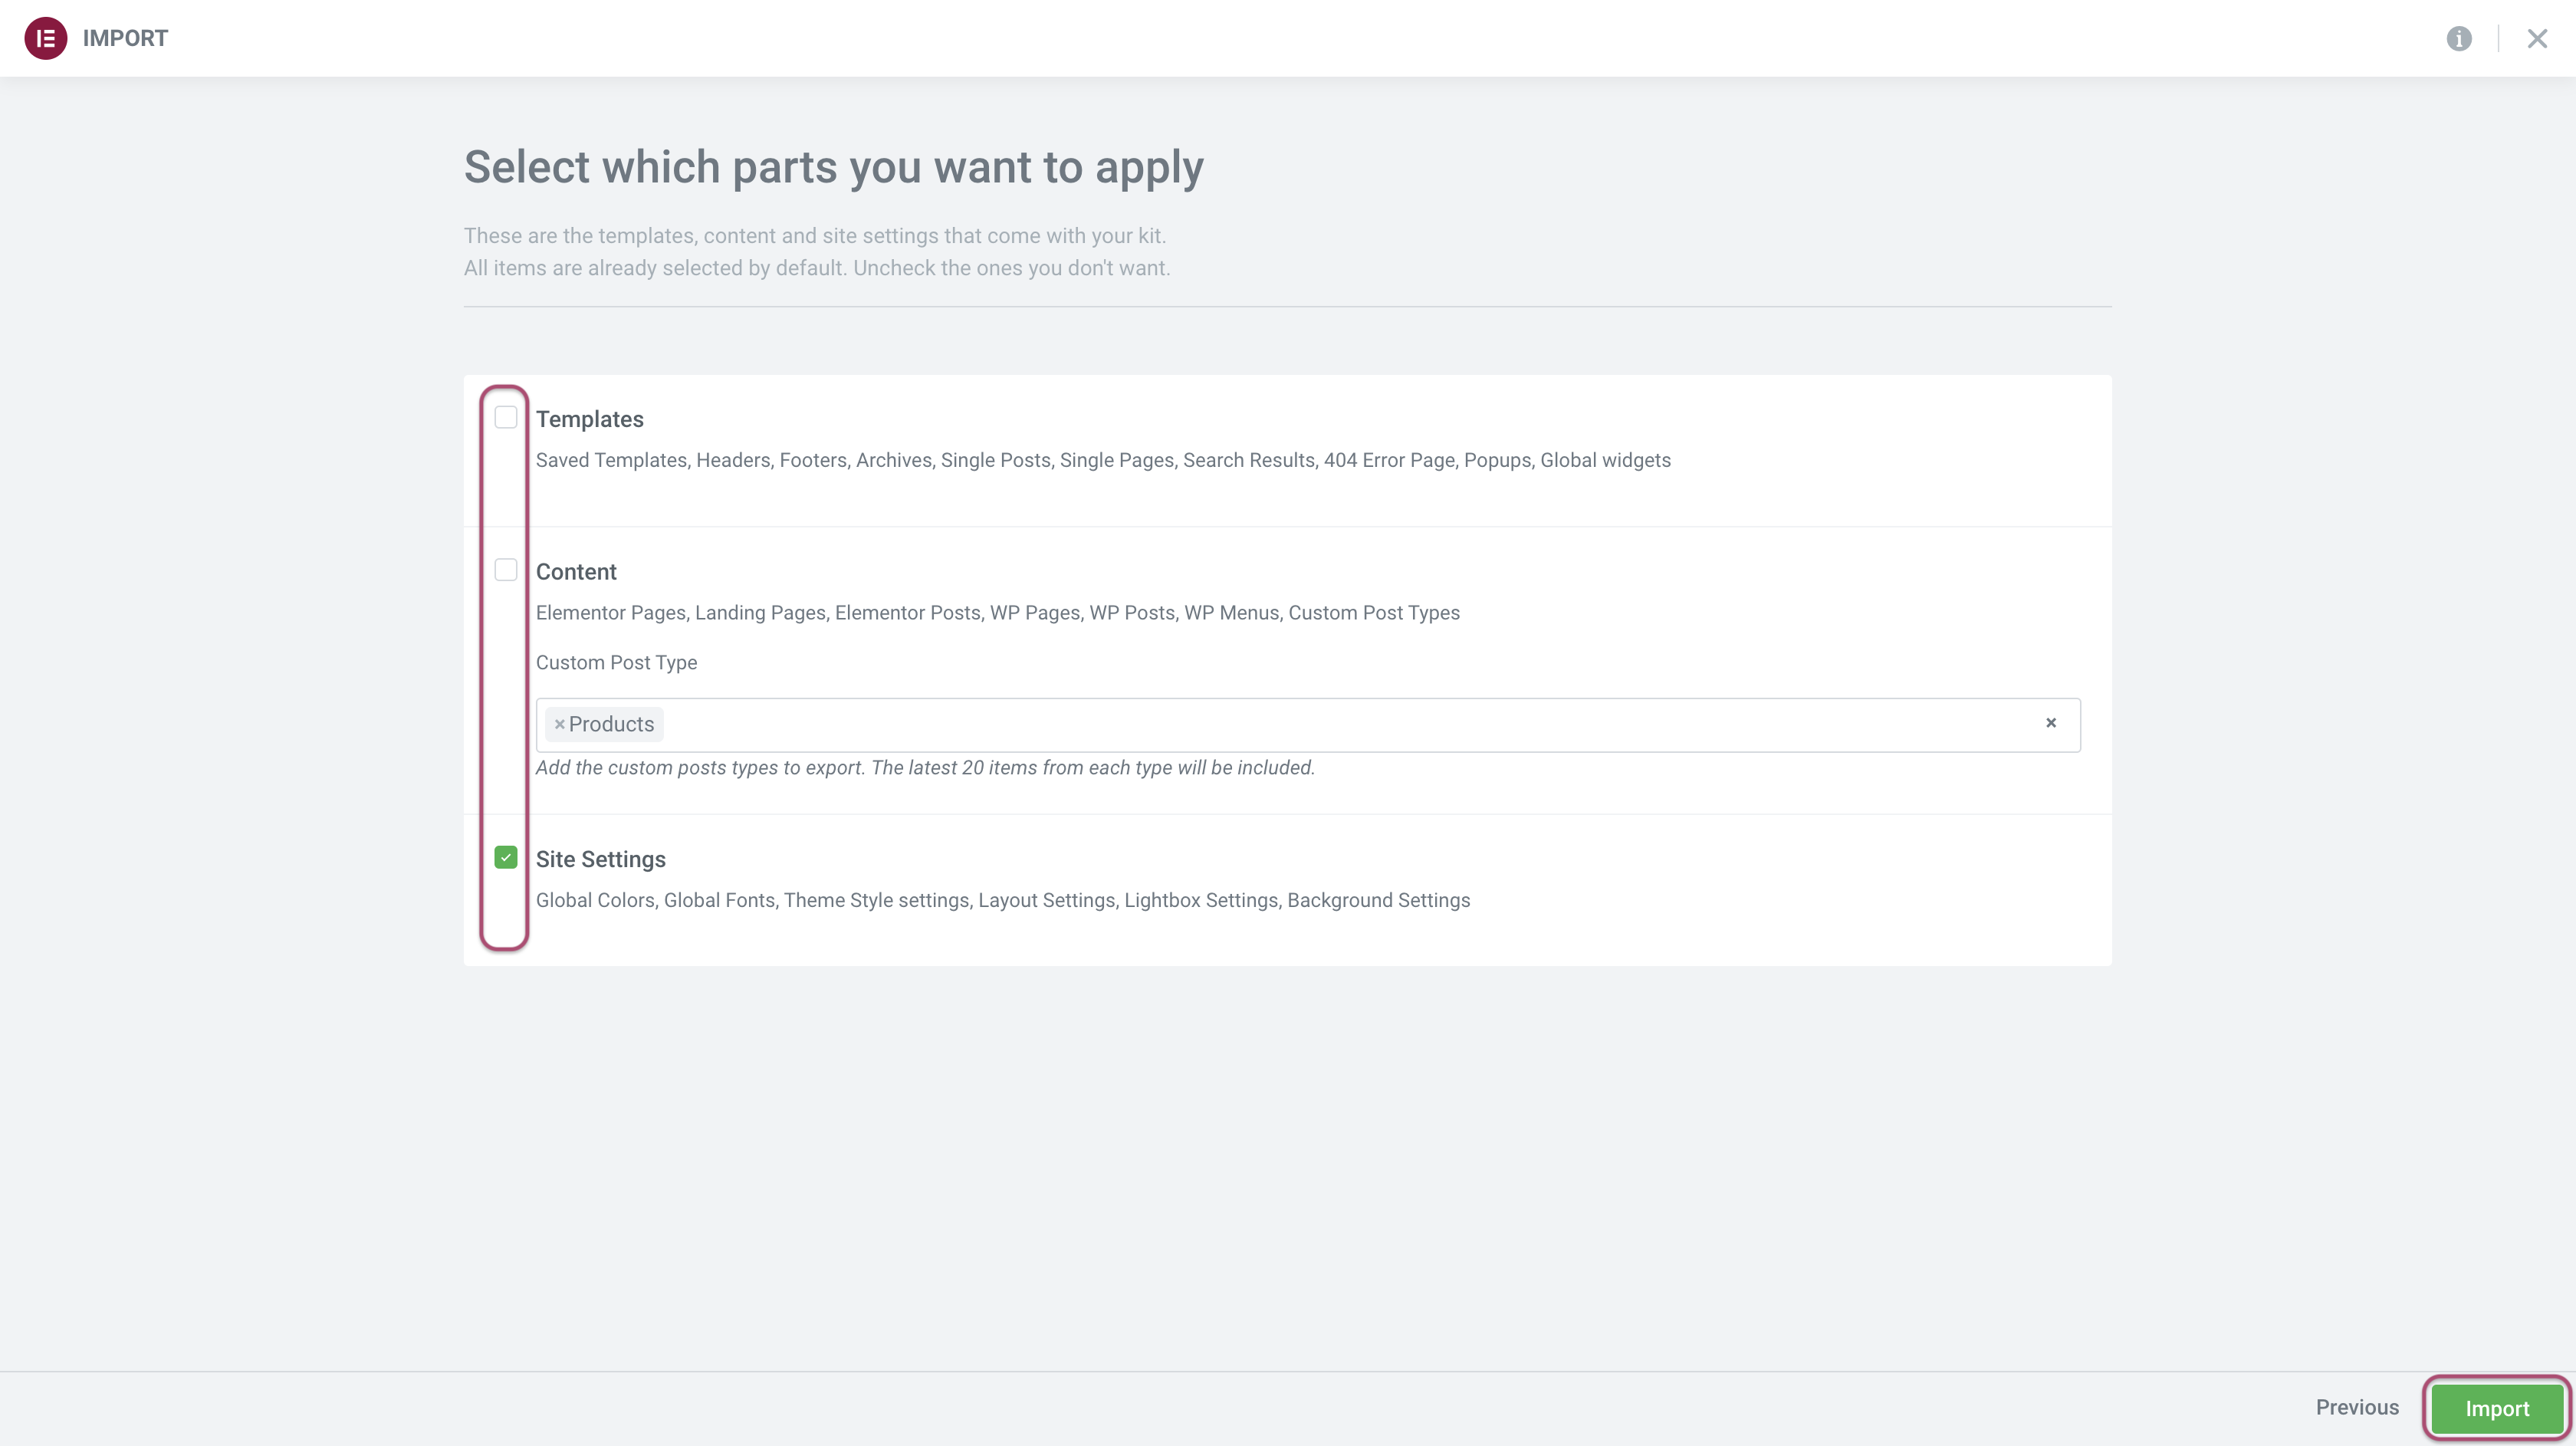
- Go to WordPress Admin > Elementor > Tools
- Click on Import / Export Kit tab
- Click on Start Import button
- Unzip our Kit‘s zip file > Select the elementor-kit.zip file
- Check only the Site Settings box
- Click on Next button
- Wait while the installation is done. Do not leave the page during the process…
- After the success message “Your kit is now live on your site!”, you can click on Back to dashboard button
Missing templates
For some unknown reason, sometimes you need to manually add some templates that did not load during the Import Template Kit phase.
Firstly check in WordPress Admin > Templates > Saved Templates if there all templates.
if files are missing, follow these steps:
- Unzip our Kit‘s zip file
- In Kit folder > json folder > templates folder > see all Templates .json files
- Go to WordPress Admin > Templates > Saved Templates
- At the top of the page, click on Import Templates button
- Load the missing file
- Click on Import Now button